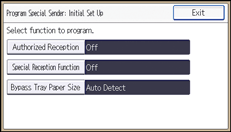
Configure the following settings for initial setup of the special senders function:
Authorized Reception
Specify whether or not to enable Authorized Reception for special senders.
Special Reception Function
Specify whether or not to enable the functions applied to individual special senders (such as Forwarding per Sender and Memory Lock RX per Sender)
When you select [Off] for this setting, the functions applied to special senders are disabled and the settings of [Reception Settings] for all senders are enabled.
Bypass Tray Paper Size
Specify the paper size that will be used for the bypass tray.
Use this setting when you register a special sender that uses the bypass tray for [Paper Tray per Sender].
You can select the method of specifying size between [Regular Size], [Custom Size], and [Auto Detect]. If you select [Auto Detect], the machine recognizes the paper size automatically.
![]() Press [Facsimile Features].
Press [Facsimile Features].
![]() Press [Reception Settings].
Press [Reception Settings].
![]() Press [Program Special Sender].
Press [Program Special Sender].
![]() Press [Initial Set Up].
Press [Initial Set Up].
![]() Select the function you want to program.
Select the function you want to program.

![]() Configure the Authorized Reception settings when necessary.
Configure the Authorized Reception settings when necessary.
Press [Authorized Reception], press [On] or [Off], and then press [OK].
![]() Configure the Special Reception Function settings when necessary.
Configure the Special Reception Function settings when necessary.
Press [Special Reception Function], press [On] or [Off], and then press [OK].
![]() Configure the Bypass Tray Paper Size settings when necessary.
Configure the Bypass Tray Paper Size settings when necessary.
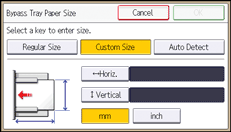
Press [Bypass Tray Paper Size], and then press [Regular Size] or [Custom Size].
Regular Size
Select a size, and then press [OK].
Custom Size
Press [Horiz.]. Enter the horizontal size of the paper using the number keys, press [
 ], and then press [OK].
Press [Vertical]. Enter the vertical size of the paper using the number keys, press [
 ], and then press [OK].
Specify a horizontal size from 148 mm (5.9 inches) to 600 mm (23.6 inches).
Specify a vertical size from 90 mm (3.6 inches) to 305 mm (12.0 inches).
Each time you press [mm] or [inch], the units switch between "mm" and "inch". If you enter a length and change the units by pressing [mm] or [inch], it is converted automatically (fractions are rounded off).
After configuring the settings, press [OK].
Auto Detect
Make sure that [Auto Detect] is selected.
![]() Press [Exit] four times.
Press [Exit] four times.
