To protect it from shock and vibration during transit, this printer comes packaged in cushioning foam and secured with tape. Remove these protective materials after bringing the printer to where it will be installed.
![]()
|
![]()
|
![]()
|
![]()
|
![]()
|
![]()
|
![]()
|
![]()
|
![]()
Removed tape is dirty. Be careful not to let it touch your hands or clothes.
Do not grip the tray area when lifting the printer.
Do not allow paper clips, staples, or other small metallic objects to fall inside the printer.
When using this printer for the first time, use the print cartridge packaged with the printer.
![]() Remove the plastic bag.
Remove the plastic bag.
![]() Pull out tray 1, and then remove the red tag on the tray. Take out the items inside tray 1.
Pull out tray 1, and then remove the red tag on the tray. Take out the items inside tray 1.
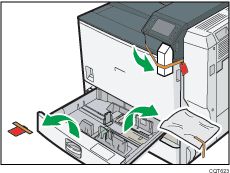
![]() Remove the tape.
Remove the tape.
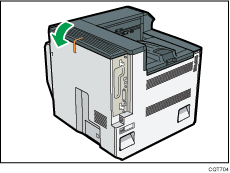
![]() Push the paper tray carefully into the printer until it stops.
Push the paper tray carefully into the printer until it stops.
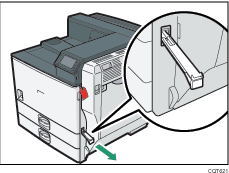
![]() Pull out the handle from the right side of the printer.
Pull out the handle from the right side of the printer.
![]() Lift the printer with four people by using the handles on both sides of the printer.
Lift the printer with four people by using the handles on both sides of the printer.
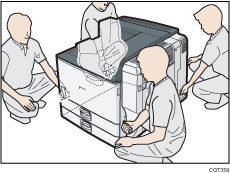
Leave the tape in place while moving the printer.
Lower the printer slowly and carefully to prevent trapping your hands.
![]() Return the handle you pulled out from the printer to its original position.
Return the handle you pulled out from the printer to its original position.
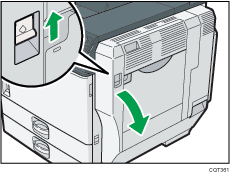
![]() Push up the lever on the right side, and open the printer's right cover carefully.
Push up the lever on the right side, and open the printer's right cover carefully.
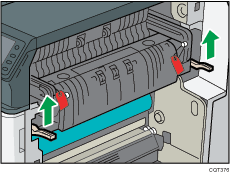
![]() Raise the brown levers on both sides.
Raise the brown levers on both sides.
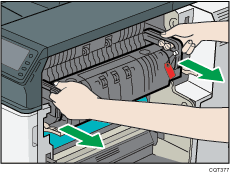
![]() Holding the fusing unit by the handles, slowly pull out the fusing unit until it stops.
Holding the fusing unit by the handles, slowly pull out the fusing unit until it stops.
![]() Raise the brown levers on both sides again.
Raise the brown levers on both sides again.
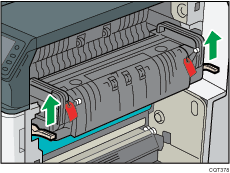
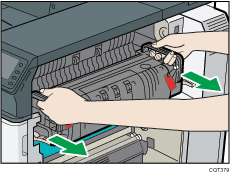
![]() Holding the fusing unit firmly by the handles, pull out the fusing unit completely. Place it on a flat surface.
Holding the fusing unit firmly by the handles, pull out the fusing unit completely. Place it on a flat surface.
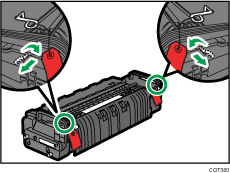
![]() Turn toward you the pins that have a red tag, and then pull those pins out.
Turn toward you the pins that have a red tag, and then pull those pins out.
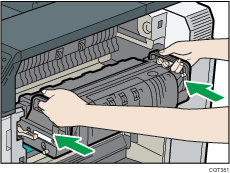
![]() Holding the fusing unit by the handles, carefully push the fusing unit into the printer completely.
Holding the fusing unit by the handles, carefully push the fusing unit into the printer completely.
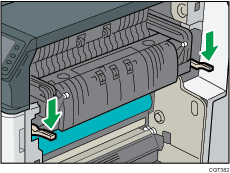
![]() Lower the brown levers back in place.
Lower the brown levers back in place.
![]() Carefully close the right cover.
Carefully close the right cover.
![]() Holding the left and right side grips, carefully open the front cover.
Holding the left and right side grips, carefully open the front cover.
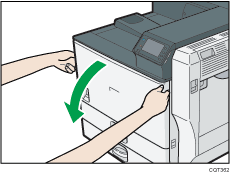
![]() Remove the orange tape from the development unit and pull it out.
Remove the orange tape from the development unit and pull it out.
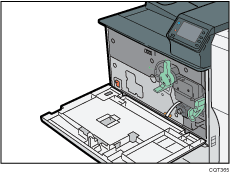
This completes the preparation of the development unit. Leave the front cover open, and install the toner as shown next.
![]() Turn the green handle counterclockwise until it clicks into place.
Turn the green handle counterclockwise until it clicks into place.
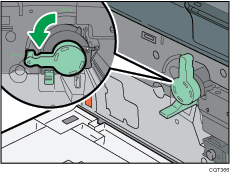
![]() Pushing the green locking lever down, pull out the toner holder carefully by the handle until it stops.
Pushing the green locking lever down, pull out the toner holder carefully by the handle until it stops.
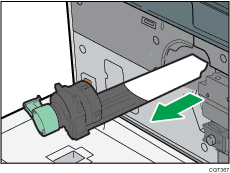
![]() Take the toner containers out of the box.
Take the toner containers out of the box.
![]() Shake the toner back and forth about five or six times.
Shake the toner back and forth about five or six times.
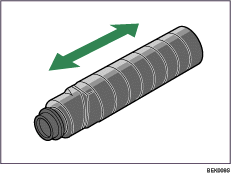
Even distribution of toner within the cartridge improves print quality.
![]() Remove the black cap of the new black toner by turning it counterclockwise.
Remove the black cap of the new black toner by turning it counterclockwise.
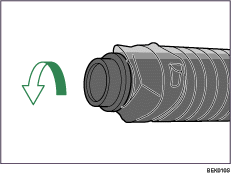
Do not shake or jar the toner after removing the black cap as toner can scatter easily.
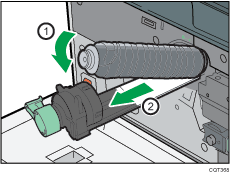
![]() Put the toner onto the toner holder in angle (1), place it flat on the toner holder, and then slide it towards you to secure it in place (2).
Put the toner onto the toner holder in angle (1), place it flat on the toner holder, and then slide it towards you to secure it in place (2).
![]() Push the toner holder back in carefully until it clicks into place.
Push the toner holder back in carefully until it clicks into place.
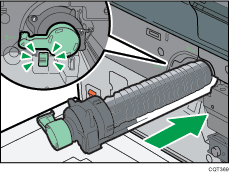
Do not push in and remove the holder repeatedly. Doing so could result in toner leak.
![]() Turn the green handle clockwise until it clicks into place.
Turn the green handle clockwise until it clicks into place.
Confirm that the holder is secured with the green locking lever.
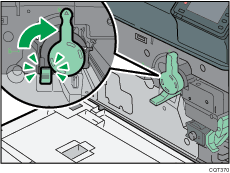
![]() Close the front cover.
Close the front cover.
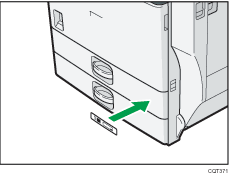
![]() Put the label "1" on the front of tray 1.
Put the label "1" on the front of tray 1.
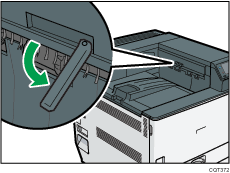
![]() Slide out the paper-full detector.
Slide out the paper-full detector.
The printer automatically stops ejecting paper when the paper-full detector detects that the standard output tray has become full.
When you have finished unpacking, do the following:
Check the procedures for setting up the printer. For details, see Printer Set Up Procedure |
