Settings you can configure in the TWAIN dialog box
This section explains the settings you can configure using the TWAIN dialog box.
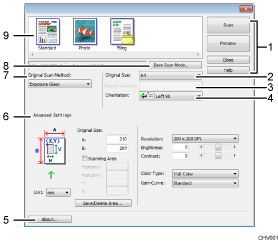
Buttons
Scan
Click to start scanning.
Preview
Click to display a scanned image.
Close
Click to close the user interface of the TWAIN driver.
Help
Click to display Help.
Original Size:
Specify the size of the original. Ten default original regular sizes are available.
Original Orientation
Specify the orientation of the paper if a standard paper size is selected under [Original Size:].
Rotation:
Specify a page orientation.
About...
Displays the version of the TWAIN driver.
Advanced Settings
Original Size:
Enter the values in [A:] and [B:] to specify a custom size.
Resolution:
Specify the scan resolution.
Brightness:
Specify the brightness.
Contrast:
Specify the image contrast.
Color Type:
Select the color you want to use from [Black & White], [Photo], [Grayscale] or [Full Color].
Gam-Curve:
Adjust image outlines.
Save/Delete Area…
Select to save or delete the [Original Size:] and [Scanning Area:] settings.
Unit:
Select a unit of measurement: [mm], [inch], or [pixel].
Scanning Area:
Check the [Scanning Area:] check box to specify a scan area.
Pos. X: upper-left X-coordinate of a scan area
Pos. Y: upper-left Y-coordinate of a scan area
H: horizontal length of the scan area
V: vertical length of the scan area
Original Scan Method:
Select either [Exposure Glass] to scan from the exposure glass or [ADF] to scan from the Automatic Document Feeder.
Save Scan Mode…
Select this check box to save the current settings.
Save/Delete Mode
Select a scan mode icon. The modes saved using [Save Scan Mode…] are displayed here.
![]()
If the size of a scanned image is larger than the memory capacity, an error message appears and scanning is canceled. If this is the case, specify lower resolution settings and scan the original again.