Connecting a Digital Camera Using a USB Cable for Printing
You can connect a PictBridge-compatible digital camera to the machine using a USB cable to directly print photographs.
![]()
Use the USB cable bundled with your digital camera.
Make sure your digital camera supports PictBridge.
Memory overflow errors can occur when printing a high-resolution image. If this happens, reduce the size of the data, and then try the operation again.
![]() Make sure that both the machine and the digital camera are turned on.
Make sure that both the machine and the digital camera are turned on.
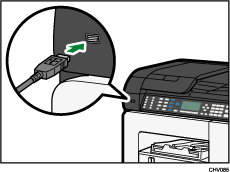
![]() Connect the USB cable, and then connect the other end of the cable to your digital camera.
Connect the USB cable, and then connect the other end of the cable to your digital camera.

If your digital camera is connected to the machine properly, “PictBridge Sett.” appears on the panel display of the machine.
![]() On your digital camera, select the images you want to print, and then specify the printing conditions.
On your digital camera, select the images you want to print, and then specify the printing conditions.
![]() The machine receives the setting configurations from the digital camera and starts printing.
The machine receives the setting configurations from the digital camera and starts printing.
Disconnect the USB cable from the machine.
![]()
Some digital cameras require settings for manual PictBridge operation. For details, see the manual provided with the digital camera.
Some digital cameras require turning the power switch off for a manual PictBridge operation. For details, see the manual provided with the digital camera.
When a digital camera is not connected to the machine, store the USB cable in a location where it will not be damaged.

