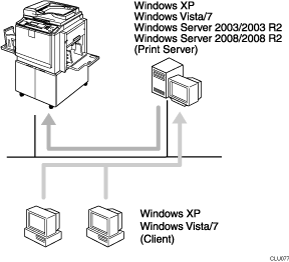
Printing with a Windows Print Server
This section describes how to configure a client computer on a network using Windows as a print server.
When using a Windows print server, select a shared printer on Windows.
This section describes running [Add Printer Wizard] on each client computer, and adding the Windows print servers as the network printer.
These instructions are for Windows XP.
When using a print server connected to the printer with SmartDeviceMonitor for Client, you cannot use Recovery Printing and Parallel Printing.
When using Windows XP/Vista/7 or Windows Server 2008/2008 R2 as a print server, the client computer cannot receive notification of print job completion.
This section assumes the client is already configured to communicate with a Windows print server. Do not begin the following procedure until the client computer is set up and configured correctly.
![]() On the [Start] menu, and then click [Printers and Faxes].
On the [Start] menu, and then click [Printers and Faxes].
![]() Click [Add a printer].
Click [Add a printer].
![]() Click [Next].
Click [Next].
![]() Click [A network printer, or a printer attached to another computer] and then click [Next].
Click [A network printer, or a printer attached to another computer] and then click [Next].
![]() Click [Browse for a printer] and then click [Next].
Click [Browse for a printer] and then click [Next].
![]() Click the name of the printer you want to use, and then click [Next].
Click the name of the printer you want to use, and then click [Next].
![]() Click [Next].
Click [Next].
![]() Click [Finish].
Click [Finish].