Loading Envelopes
![]()
|
![]()
Before printing on envelopes, make sure to lower the levers on the machine rear, inside the rear cover, to avoid envelopes coming out creased. Also, pull up the levers back to their original positions after printing. Leaving the levers lowered can cause print quality problems when printing on paper other than envelopes.
Avoid using self-adhesive envelopes. They may cause machine malfunctions.
Check there is no air in the envelopes before loading.
Envelopes whose flaps are open must be printed with the flaps open, and envelopes whose flaps are closed must be printed with the flaps closed.
Load only one size and type of envelope at a time.
Before loading envelopes, flatten their leading edges (the edge going into the machine) by running a pencil or ruler across them.
Some kinds of envelope might cause misfeeds, wrinkles or print poorly.
Print quality on envelopes may be uneven if parts of an envelope have different thicknesses. Print one or two envelopes to check print quality.
In a hot and humid environment, the envelope might be output creased or improper printing quality.
After loading envelopes in the tray, specify the paper type and size using the control panel to avoid printing problems. This machine does not detect the paper size automatically.
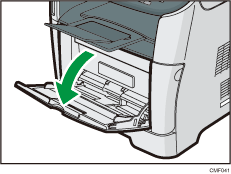
![]() Open the bypass tray.
Open the bypass tray.
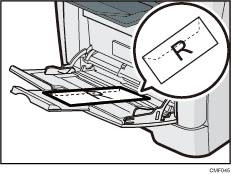
![]() Slide the side guides outward, then load envelopes with the print side up, and push in until it stops against the machine.
Slide the side guides outward, then load envelopes with the print side up, and push in until it stops against the machine.
Envelopes whose flaps are open must be printed with the flaps open, and envelopes whose flaps are closed must be printed with the flaps closed. Before loading envelopes, make sure they are as flat as possible.
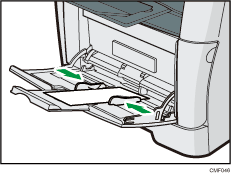
![]() Adjust the side guides to the envelope width.
Adjust the side guides to the envelope width.
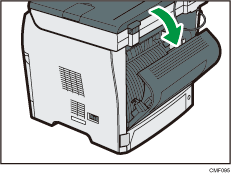
![]() Open the rear cover.
Open the rear cover.
![]() Lower the levers for printing envelopes on both sides to the position indicated with an envelope mark.
Lower the levers for printing envelopes on both sides to the position indicated with an envelope mark.
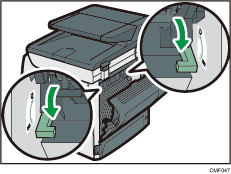
Make sure to pull up the levers back to their original positions after printing.
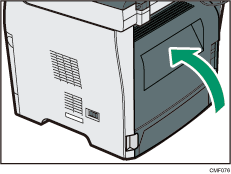
![]() Close the rear cover.
Close the rear cover.
![]()
After loading envelopes in the tray, specify the paper type and size using the control panel. Also, specify the printer driver's paper setting accordingly before printing.
Be sure to load envelopes so that their flaps are on the left. If you do not, the envelopes will become creased.
If printed envelopes come out badly creased, load the envelopes in the opposite direction, and then rotate the print object by 180 degrees using the printer driver before printing. For details, see the printer driver Help.
![]()
For details about supported types of paper, see Paper and Other Media
 .
.For details about specifying the paper type and size, see Specifying Paper Type and Paper Size
 .
.

