This section describes the screen layout when using the network delivery scanner.
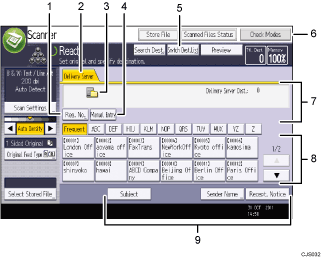
[Reg. No.]
Press this key to specify the destination using a 5-digit registration number.
Delivery Server
This tab is highlighted when the delivery scanner function is being used.
Network delivery scanner icon
Indicates that the network delivery scanner screen is displayed.
[Manual Entry]
To send a file by e-mail via the delivery server to a destination not registered in the delivery server's destination list, press this key to display the soft keyboard. Then use the soft keyboard to enter the e-mail address. For details about how to send a file by e-mail via the delivery server, see ScanRouter delivery software manual.
[Swtch Dest.List]
Press to switch to the [E-mail] screen, [Scan to Folder] screen, or the WSD scanner screen. If you are not using the WSD scanner, [Delivery Dest.] appears.
[Check Modes]
Allows you to confirm the scanning settings.
Destination field
The specified destination appears. If more than one destination has been specified, press [
 ] or [
 ] to scroll through the destinations.
Destination list
The list of destinations registered in the delivery server appears. If all of the destinations cannot be displayed, press [
] or [] to switch the screen.The (
 ) symbol indicates a group destination.
[Subject], [Sender Name], and [Recept. Notice]
Specify the subject, sender, and whether or not to enable Message Disposition Notification for the file to be transmitted.
![]()
The ScanRouter delivery software is no longer available for sale.