![]()
This machine supports FAT16 or FAT32 format USB flash memory and SD cards. Other forms of removable memory device are not compatible.
SD cards with storage capacity up to 2GB can be used.
Make sure that the format of the removable memory device is FAT16 or FAT32.
Saving might fail if the USB flash memory features password protection or other security features.
Connect only USB flash memory to the USB slot, not any other form of USB device.
Do not use a USB extension cable to connect a USB memory to the machine. Insert the USB memory directly into the media slot.
Do not remove the media while data is being written. Doing so will result in corrupted data.
Do not turn the machine's main power switch to off while data is being written. Doing so will result in corrupted data.
If the machine's main power is accidentally switched off while data is being written, you must check the data on your media for corruption when you switch the machine back on.
USB flash memory devices and SD cards are supported for direct printing. However, certain types of USB flash memory devices and SD cards cannot be used. For details, contact your sales or service representative.
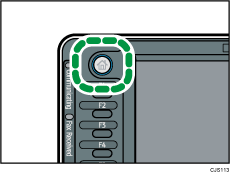
![]() Press the [Home] key on the top left of the control panel, and press the [Scanner] icon on the [Home] screen.
Press the [Home] key on the top left of the control panel, and press the [Scanner] icon on the [Home] screen.
![]() Insert a removable memory device in the media slot.
Insert a removable memory device in the media slot.
You can connect only one removable memory device at a time. The media slot cannot be used if both an SD card and a USB flash memory are inserted into it at the same time.
![]() Make sure that no previous settings remain.
Make sure that no previous settings remain.
If a previous setting remains, press the [Reset] key.
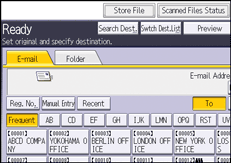
![]() Place originals.
Place originals.
![]() Press [Store File].
Press [Store File].
![]() Press [Store to Memory Device].
Press [Store to Memory Device].
![]() Press [OK].
Press [OK].
![]() If necessary, specify the scan settings according to the original to be scanned.
If necessary, specify the scan settings according to the original to be scanned.
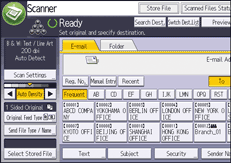
Example: Scanning the document in color/duplex mode, and saving as a PDF file.
Press [Scan Settings], and then press [Full Colour: Text / Photo] in the [Original Type] tab.
Press [Original Feed Type], and then press [2 Sided Original].
Press [PDF] under [Send File Type / Name].
For information about other settings, see Various Scan Settings![]() .
.
![]() Press the [Start] key.
Press the [Start] key.
When scanning batches, place subsequent originals after the scan files have been sent.
When writing is complete, a confirmation message appears.
![]() Press [Exit].
Press [Exit].
![]() Remove the memory device from the media slot.
Remove the memory device from the media slot.
Remove the media from the media slot only after data has been written completely. Removing the media while data is being written will result in corrupted data.
![]()
The amount of time required to save files to a USB flash memory device or SD card will vary according to the device's specifications.
The documents stored on the removable media device can be printed from the machine's control panel. For details, see "Printing Files from an External Memory Device", Print.
The documents stored on the removable media device cannot be sent from the machine's control panel.
Depending on the security settings, [Store to Memory Device] may not be displayed. Consult your administrator.
You cannot specify where the data is saved. Files are saved in the root directory of the removable memory device.
If the removable memory device is partitioned, files are saved on the first partition.
You cannot configure file information such as [User Name], [File Name], and [Password].
The amount of free space on the memory device is displayed. Note that if the amount of free space exceeds 10 GB, "9999.99 MB" will be displayed.
To cancel writing, press the [Stop] key. If files are being written when writing is cancelled, any partially written files are deleted. Only complete files are stored on the removable memory device.