Use this function to print page numbers on your copies.

![]()
You cannot use the bypass tray with this function.
Page number formats
There are six formats available for page numbering.
P1,P2...
1/5,2/5...
-1-,-2-...
P.1,P.2...
1,2...
1-1,1-2...
Items
In the Page Numbering function, specify the following items. Items to specify differ according to the format you select.
First Printing Page
Enter the number of the page from which printing starts.
First Printing Number
Enter the number of the page from which page numbering starts.
Last Number
Enter the number of the page at which page numbering ends. For example, if you want to print seven pages only, enter "7" for [Last Number]. Normally, you do not need to enter the number.
Total Pages
Enter the total number of the pages of the original. Specify this item when selecting [1/5,2/5...] as the format.
First Chapter No.
Enter the number of the chapter from which chapter numbering starts. Specify this item when selecting [1-1,1-2...] as the format.
For example, when you select [1/5,2/5...] as the page numbering format and specify "1" in [First Printing Number] and "4" in [Total Pages], it is printed in the order of 1/4, 2/4, 3/4, and 4/4.
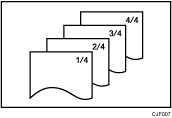
Refer to the following examples when entering items.
Replacing a copy with a printed page number with new one
If you select [1/5,2/5...] as a format and want to replace the third page of four pages, enter "3" in [First Printing Number] and "4" in [Total Pages].
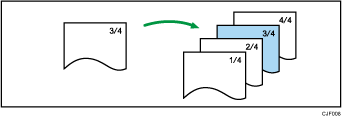
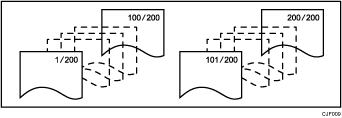
Copying a large number of originals by dividing them into parts
If you select [1/5,2/5...] as a format and copy 200 pages of originals but only 100 pages can be loaded in the ADF, copy them by dividing in half. To make page numbers of copies stay in serial order by performing the following procedure.
Place the first 100 pages of the original in the ADF.
Enter "200" in [Total Pages], and then copy them.
Place the other 100 pages in the ADF.
Enter "101" in [First Printing Number] and "200" in [Total Pages], and then copy them.
Printing page numbers except first and last pages (printing "1" on the second page)
If you do not want the page numbers printed on the first and last pages of copies, specify the following three items.
In [First Printing Page], enter "2".
In [First Printing Number], enter "1".
In [Last Number], enter a number that is two less than the total original pages.

![]() Press [Edit / Stamp].
Press [Edit / Stamp].
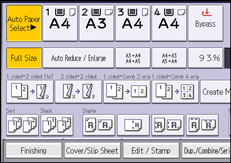
![]() Press [Stamp].
Press [Stamp].
![]() Press [Page Numbering].
Press [Page Numbering].
![]() Select the page numbering format.
Select the page numbering format.
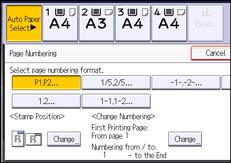
![]() Press [Change] under [Stamp Position].
Press [Change] under [Stamp Position].
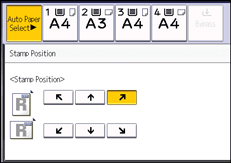
![]() Select the stamp position, and then press [OK].
Select the stamp position, and then press [OK].
![]() Press [Change] under [Change Numbering].
Press [Change] under [Change Numbering].
![]() Specify the items displayed on the screen as necessary, and then press [OK].
Specify the items displayed on the screen as necessary, and then press [OK].
![]() Press [OK] twice.
Press [OK] twice.
![]()
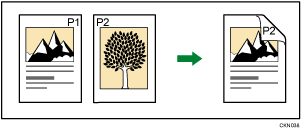
If you combine this function with the Duplex (Top to Top) function and select [P1,P2...] or [1/5,2/5...], page numbers on the back are printed as follows:
When Page Numbering is used with the Combine function or bookbinding function such as Booklet, page numbers are printed as follows:
[Per Original] is selected in [Page Numbering in Combine]:
With the One-sided Combine or Two-sided Combine function
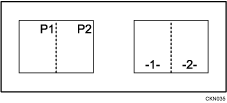
With the Magazine or Booklet function
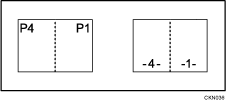
With Magazine & Combine or Booklet & Combine function
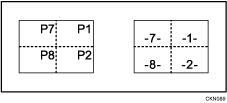
[Per Copy] is selected in [Page Numbering in Combine]:
With the One-sided Combine or Two-sided Combine function
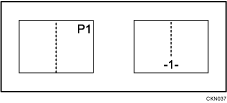
With Magazine & Combine or Booklet & Combine function
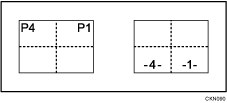
For details, see Stamps
 .
.You can change the settings for Page Numbering under [Page Numbering] in User Tools. For details, see Page Numbering
 .
.You can change the stamp position if Combine or Duplex is specified for use with this function under [Duplex Back Page Stamping Position] or [Page Numbering in Combine] in User Tools. For details about these settings, see Page Numbering
 .
.
