Settings you can configure for the fax cover sheets
This section describes the settings you can configure for the fax cover sheets.
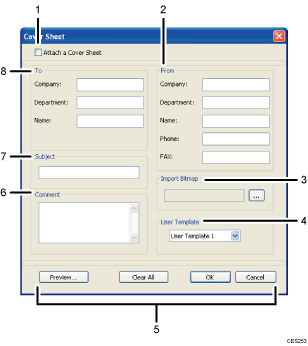
Attach a Cover Sheet
Check this to send a fax with a cover sheet.
From
Enter the sender information. Items left blank will not appear on the cover sheet.
Company:
Enter your company name. Can contain up to 64 characters.
Department:
Enter your department name. Can contain up to 64 characters.
Name:
Enter your name. Can contain up to 64 characters.
Phone:
Enter your telephone number. Can contain up to 64 characters.
FAX:
Enter your fax number. Can contain up to 64 characters.
Import Bitmap
Specify a bitmap image you want to show on the cover sheet. The image will be shown in the position as follows: Left=180, Right=800, Top=50, Bottom=180 (pixel). If the image is larger than this area, excess part is trimmed.
User Template
Select the template for the cover sheet. There are three templates.
Buttons
Preview...
Click to preview the cover sheet before sending the fax.
Clear All
Click to clear all information you entered.
OK
Click to finish editing the fax cover sheet.
Cancel
Click to discard the fax cover sheet.
Comment
Enter a comment for the fax. Can contain up to 256 characters.
Subject
Enter the subject of the fax. Can contain up to 64 characters.
To
Enter the destination information. Items left blank will not appear on the cover sheet.
Company:
Enter the destination company name. Can contain up to 64 characters.
Department:
Enter the destination department name. Can contain up to 64 characters.
Name:
Enter the destination name. Can contain up to 64 characters.