Setting the machine to receive an IPv4 address automatically
![]()
A DHCP server is required on the network for the machine to receive an IPv4 address automatically.
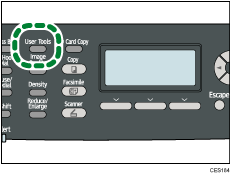
![]() Press the [User Tools] key.
Press the [User Tools] key.

![]() Press the [
Press the [![]() ] [
] [![]() ] keys to select [Network Settings], and then press the [OK] key.
] keys to select [Network Settings], and then press the [OK] key.
![]() If you are requested to enter a password, enter the password using the number keys, and then press the [OK] key.
If you are requested to enter a password, enter the password using the number keys, and then press the [OK] key.
![]() Press the [
Press the [![]() ] [
] [![]() ] keys to select [IPv4 Configuration], and then press the [OK] key.
] keys to select [IPv4 Configuration], and then press the [OK] key.
![]() Press the [
Press the [![]() ] [
] [![]() ] keys to select [DHCP], and then press the [OK] key.
] keys to select [DHCP], and then press the [OK] key.
![]() Press the [
Press the [![]() ] [
] [![]() ] keys to select [Active], and then press the [OK] key.
] keys to select [Active], and then press the [OK] key.
![]() Press the [User Tools] key to return to the initial screen.
Press the [User Tools] key to return to the initial screen.
![]() If you are requested to restart the machine, turn off the machine, and then turn it back on.
If you are requested to restart the machine, turn off the machine, and then turn it back on.
![]() Print the configuration page to confirm the setting.
Print the configuration page to confirm the setting.
The IPv4 address setting will appear under “TCP/IP” on the configuration page.
![]()
You can press the [Escape] key to exit to the previous level of the menu tree.
A password for accessing the [Network Settings] menu can be specified in [Admin. Tools Lock].
If your network environment requires a specific transmission speed that is not automatically detected, set the transmission speed in [Set Ethernet Speed] under [Network Settings].
When [DHCP] is activated, manually configured IPv4 address settings are not used.
![]()
For details about turning the machine on and off, see Turning the Power on
 .
.For details about printing configuration page, see Printing the Configuration Page
 .
.For details about [Admin. Tools Lock], see Administrator Settings
 .
.For details about [Set Ethernet Speed], see Network Settings
 .
.

