Printing a Stored Print file
The following procedure describes how to print a Stored Print file with the PCL 5e/6 printer driver.
![]()
Applications with their own drivers, such as PageMaker, do not support this function.
![]() Configure Stored Print in the printer driver's properties.
Configure Stored Print in the printer driver's properties.
You can select four methods of Stored Print:
To use the Stored Print (Shared) and Store and Print (Shared) functions, authentication must be enabled beforehand. For details, consult your administrator.
Stored Print
Stores the file in the machine and prints it later using the control panel.
Store and Print
Prints the file at once and also stores the file in the machine.
Stored Print (Shared)
Stores the file in the machine and allows any user who has print privileges to print the file later using the control panel.
Store and Print (Shared)
Prints the file immediately and also stores the file in the machine. Any user who has print privileges can print any stored file afterward.
![]() Click [Details...], and then enter a User ID in the [User ID:] box.
Click [Details...], and then enter a User ID in the [User ID:] box.
You can also set a file name and a password. The same password must be entered when printing or deleting.
![]() Click [OK] to close [Details...], and then click [OK] to close the printer driver's properties.
Click [OK] to close [Details...], and then click [OK] to close the printer driver's properties.
![]() Start printing from the application's [Print] dialog box.
Start printing from the application's [Print] dialog box.
The Stored Print job is sent to the machine and stored.
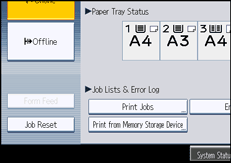
![]() On the control panel, press the [Printer] key to display the printer screen.
On the control panel, press the [Printer] key to display the printer screen.
![]() Press [Print Jobs].
Press [Print Jobs].

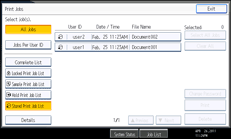
![]() Press [Stored Print Job List].
Press [Stored Print Job List].

A list of Stored Print files stored in the machine appears.
Depending on the security settings, certain print jobs may not be displayed.
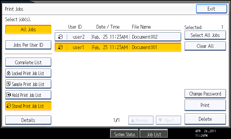
![]() Select the file you want to print, and press [Print].
Select the file you want to print, and press [Print].

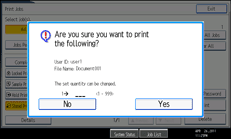
The confirmation screen appears.
If you set a password in the printer driver, a password confirmation screen appears. Enter the password.
If multiple print files are selected, and some of these require a password, the machine prints files that correspond to the entered password and files that do not require a password. The number of files to be printed is displayed on the confirmation screen.
If you forgot your password, ask your file administrator for help.
![]() Enter the number of sets using the number keys if necessary, and then press [Yes].
Enter the number of sets using the number keys if necessary, and then press [Yes].

You can enter up to 999 sets.
Press the [Clear/Stop] key to correct any entry mistakes.
The Stored Print file is printed.
![]()
If you want to cancel printing, press [No] in step 9.
If you select multiple files, the confirmation screen displays the total number of files to be printed. If you select multiple documents, set numbers are determined based on the smallest set number specified for a selected document.
When printing accumulated stored print documents, you cannot change the numbers of sets.
To stop printing after printing has started, press [Exit] until the printer screen appears, and then press [Job Reset]. A Stored Print file is not deleted even if [Job Reset] is pressed.
The Stored Print file that sent to the machine is not deleted unless you delete a file or select [Auto Delete Stored Print Jobs]. For details about the auto delete settings, see "System".
For details about setting printer drivers, see the printer driver Help.
You can also print or delete a Stored Print file from Web Image Monitor. For details, see Web Image Monitor Help.

