Copying onto Envelopes from the Bypass Tray
When copying onto envelopes, specify the paper type and paper size.
![]()
Envelopes should be fed from tray 1 or the bypass tray.
Some kinds of envelopes might cause misfeeds or wrinkle. If this happens, push down the envelope lever of the fusing unit.
The Duplex function cannot be used with envelopes. If [1 Sided
 2 Sided] is selected, cancel the setting.
Specify the paper type and thickness under Paper Type: Bypass Tray in User Tools in advance. For the paper type, select [Envelope]. Specify the paper thickness depending on the thickness of the envelopes. For details, see “System Settings”, Network and System Settings Reference.
Before loading self-adhesive envelopes, be sure to fan them thoroughly. This will prevent them sticking together. If fanning does not prevent them sticking together, load them one by one. Note that some types of envelope cannot be used with this machine.
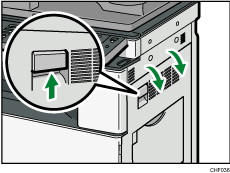
![]() Open the right cover by lifting the catch.
Open the right cover by lifting the catch.
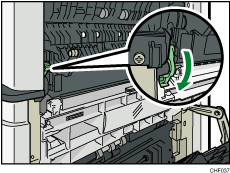
![]() Push down the envelope lever of the fusing unit on the left.
Push down the envelope lever of the fusing unit on the left.
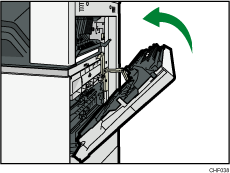
![]() Close the right cover.
Close the right cover.
![]() Open the bypass tray and set the envelopes print side down with their flaps closed and pointing toward the back of the machine. Push the envelopes into the machine until you hear the beep.
Open the bypass tray and set the envelopes print side down with their flaps closed and pointing toward the back of the machine. Push the envelopes into the machine until you hear the beep.
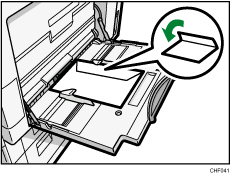
![]() Align the paper guides to the envelope size.
Align the paper guides to the envelope size.
![]() Press [Bypass], and then press the [
Press [Bypass], and then press the [![]() ] key.
] key.
![]() Press [Paper Size].
Press [Paper Size].
![]() Select the envelope size, and then press [OK] twice.
Select the envelope size, and then press [OK] twice.

![]() Place the originals, and then press the [Start] key.
Place the originals, and then press the [Start] key.
![]() When the copy job is finished, be sure to return the envelope lever to its original position.
When the copy job is finished, be sure to return the envelope lever to its original position.
If you copy onto plain paper without returning the lever to its original position, the copy quality might be reduced.
![]()
When loading envelopes in the landscape (
 ) orientation, place the original on the exposure glass with the right edge aligned to the left scale, or place the original in the ADF with the right edge inserted.
When loading envelopes in the portrait (
 ) orientation, set them print side down with their flaps open and pointing away from the machine. Load envelopes with flaps fully open. Otherwise, they might not feed into the machine.
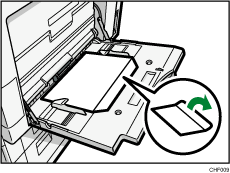
When loading envelopes in the portrait orientation (
), place the original on the exposure glass with the bottom edge aligned to the left scale, or place the original in the ADF with the bottom edge inserted.To copy onto custom size envelopes, you must specify the envelope's dimensions. When loading envelopes in the portrait orientation (
), be sure to include the fully open flap in the horizontal dimension.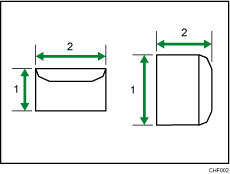
Vertical size
Horizontal size
Check the envelopes are not damp.
Load only as much envelopes as can be held between the paper guides on the bypass tray. For the number of envelopes that you can set on the bypass tray, see “Recommended Paper Sizes and Types”, About This Machine.
Check there is no air in the envelopes before loading.
To get better print quality, it is recommended that you set the right, left, top, and bottom print margin, to at least 15 mm (0.6 inches) each.
Load only one size and type of envelope at a time.
Before loading envelopes, flatten leading edges (the side going into the machine) by pressing a pencil or ruler across them.
Before loading envelopes, check they are rectangular in shape.
Printing on envelopes may be slower than printing on plain paper.
For details about supported envelope types, see “Envelopes”, About This Machine.