Registering an E-mail Destination
This section describes how to register an e-mail destination.
![]() Press the [User Tools/Counter] key.
Press the [User Tools/Counter] key.
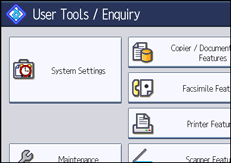
![]() Press [System Settings].
Press [System Settings].
![]() Press [Administrator Tools].
Press [Administrator Tools].
![]() Press [Address Book Management].
Press [Address Book Management].
![]() Check that [Program / Change] is selected.
Check that [Program / Change] is selected.
![]() Select the name whose e-mail address you want to register.
Select the name whose e-mail address you want to register.
Press the name key, or enter the registered number using the number keys.
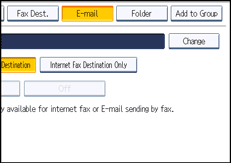
![]() Press [E-mail].
Press [E-mail].
![]() Press [Change].
Press [Change].
![]() Enter the e-mail address.
Enter the e-mail address.
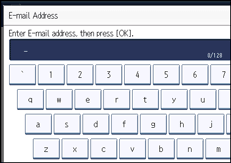
![]() Press [OK].
Press [OK].
![]() Select [E-mail / Internet Fax Destination] or [Internet Fax Destination Only].
Select [E-mail / Internet Fax Destination] or [Internet Fax Destination Only].
If [E-mail / Internet Fax Destination] is specified, registered e-mail addresses appear in both the internet fax address display and E-mail address display on the fax function screen, and in the address display on the scanner function screen.
If [Internet Fax Destination Only] is specified, registered e-mail addresses only appear in the internet fax display on the fax function screen.
![]() If you want to use Internet Fax or e-mail with the facsimile function, specify whether or not to use "Send via SMTP Server".
If you want to use Internet Fax or e-mail with the facsimile function, specify whether or not to use "Send via SMTP Server".
![]() Press [OK].
Press [OK].
![]() Press [Exit].
Press [Exit].
![]() Press the [User Tools/Counter] key.
Press the [User Tools/Counter] key.
![]()
You can enter up to 128 characters for the e-mail address.
To register the name, see "Registering Names".