Programming an End Receiver
![]()
One end receiver can be registered for each special sender. To register two or more end receivers, use group destination. However, a maximum of 498 destinations can be specified in a group.
![]() Press [Facsimile Features].
Press [Facsimile Features].
![]() Press [Reception Settings].
Press [Reception Settings].
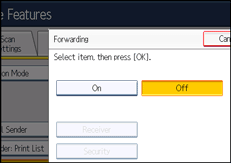
![]() Press [Forwarding].
Press [Forwarding].
![]() Press [On].
Press [On].

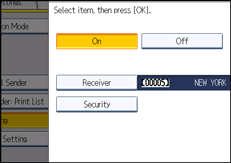
If there is an End Receiver already programmed, a receiver name is shown. If you want to change the receiver, press [Receiver] and proceed to step 5.
To cancel Forwarding, press [Off] and proceed to step 9.
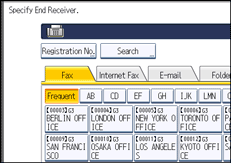
![]() Specify an End Receiver using the destination list, and then press [OK].
Specify an End Receiver using the destination list, and then press [OK].

Press the transmission type tab to switch the destination between fax number, Internet Fax destination, e-mail address, and folder destination.
IP-Fax destination appears in the fax destination list.
Set an e-mail destination in Address Book Management under Administrator Tools in the System Settings menu. See “E-mail Destination”, Network and System Settings Reference.
Set a folder destination in Address Book Management under Administrator Tools in the System Settings menu. See “Registering Folders”, Network and System Settings Reference.
If you have specified e-mail destination or folder destination for forwarding, you can specify the file format used for forwarding. See “Parameter Settings” (switch 21, bit 3).
If you make a mistake, press [Clear] before pressing [OK], and then try again.
![]() Press [Security].
Press [Security].
If not specifying the security function, proceed to step 9.
Security is set to use S/MIME authentication. For details about the security settings, consult your administrator.

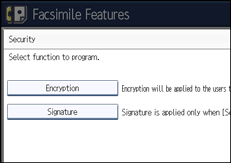
![]() Select the security functions.
Select the security functions.
To specify encryption for documents for Forwarding, press [Encryption]. To use the encryption function, the address must be stored in the Address Book and have the encryption option enabled. For details about Encryption, consult your administrator.
To attach a signature to documents for Forwarding, press [Signature]. For details about Signature, consult your administrator.

![]() Press [OK].
Press [OK].
![]() Press [OK].
Press [OK].
![]() Press the [User Tools/Counter] key.
Press the [User Tools/Counter] key.
![]()
Select [Encrypt All] in the encryption settings and encrypted e-mail is sent regardless of the encryption settings in [Security]. For details about encryption, consult your administrator.
The electronic signature is limited in the following ways, depending on the S/MIME settings on Web Image Monitor. For details about the electronic signature, consult your administrator.
If [Set Individually] is set:
You can set [Signature] in [Security] and attach an electronic signature to e-mail for every transmission.
If [Do not Use Signatures] is set:
Even if you press [Security], [Signature] does not appear.
If [Use Signatures] is set:
An electronic signature is attached when you send e-mail. The [Signature] setting in [Security] cannot be cancelled.

