
| |||
Before modifying a custom paper, confirm that no one is modifying it on Web Image Monitor or on the colour controller.
You can only change the Name, Paper Size, Apply Duplex, and Apply Auto Paper Select settings for a custom paper that is registered from the paper library.
Press the [Paper Setting] key.
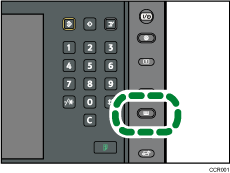
The control panel on your machine might differ slightly from the control panel in this illustration.
Press [Custom Paper].
Select the custom paper whose settings you want to modify.
Press [![]() Previous] or [
Previous] or [![]() Next] to scroll through the list to find the paper that you want to modify.
Next] to scroll through the list to find the paper that you want to modify.
Change the settings.
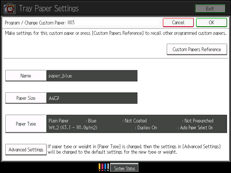
If you change the paper type or weight setting and press [OK] on the Paper Type screen, a message appears to notify you that the Advanced Settings will be initialized. To apply the changes for the paper type or weight setting, select [Change]. To cancel the changes, select [Do not Change].
Press [OK].
Press [Exit].
Press the [Paper Setting] key.
You can also close the Tray Paper Settings screen by pressing [Exit].
![]()
For details about custom paper settings, see Custom Paper Settings.
You cannot modify a custom paper that is assigned to a paper tray. To modify it, cancel the assignment.
For details about Advanced Settings, contact your machine administrator.
| Copyright (C) 2011 |