
| |||
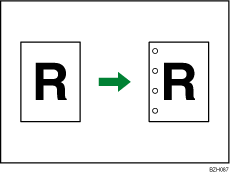
You can make punch holes in copies.
![]()
The 4-hole punch type is only capable of punching in 4-hole format.
You cannot specify Punch with Z-fold.
2 holes

4 holes
Original orientation and punch hole position
Place all the originals in the ADF in the orientation in which they can be read normally. When placing the original on the exposure glass, keep the same orientation, but set the original facing downwards.
The relationship between the orientation in which you place the original and the punch hole positions is as follows:
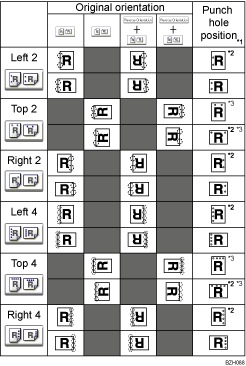
*1 The above table shows punch hole positioning. Punched sheets might not be delivered in the orientation shown in this table.
*2 You cannot make punch holes at this position when copying onto the following paper sizes: A3, B4 JIS, 11 × 17, 81/2 × 14, 8 × 13, 81/2 × 13, 81/4 × 13
*3 If you want to make punch holes at this position, select unreadable orientation in Original Orientation and then select Top 2 or Top 4.
Press [Output/ Customize Function/ Finisher].
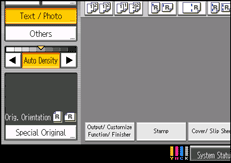
Press [Finisher].
Select one of the punch hole positions.
Press [OK].
Enter the number of copies with the number keys.
Place the originals, and then press the [Start] key.
![]()
You can change the punch hole positions shown on the initial display under Input / Output in User Tools. You can also register hole positions on the [Finisher] tab. To select a punch hole position not displayed on the initial display, you need to specify one of these settings. For details, see Input / Output.
For details about which sizes and weights of paper that can be punched, see Specifications for Punch Unit (Finisher SR5030, Booklet Finisher SR5040) (Optional), About This Machine.
When placing an original on the exposure glass, start with the first page to be copied. When placing originals in the ADF, set so that the first page is on the top.
When using Punch and Combine, Double Copies, or Auto Reduce / Enlarge, the message Orig. and paper orientation mismatched for Punch mode. Cancel Punch mode or change paper orientation in tray. may appear because of the orientation of the original and the copy paper. If this occurs, change the orientation of the copy paper.
Since punch holes are made in each copy, the punch hole positions vary slightly.
| Copyright (C) 2011 |