Auto Color Calibration
This section describes Auto Color Calibration.
If a certain color is strong or the color of the copy differs from the original, adjust the yellow, magenta, cyan, and black balance.
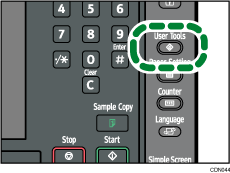
![]() Press the [User Tools] key.
Press the [User Tools] key.
![]() Press [Maintenance].
Press [Maintenance].
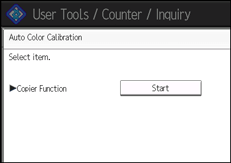
![]() Press [Auto Color Calibration].
Press [Auto Color Calibration].
![]() Press [Start].
Press [Start].
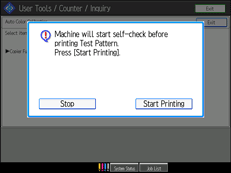
![]() Press [Start Printing].
Press [Start Printing].
A test pattern is printed.
![]() Place the test pattern on the exposure glass, and then press [Start Scanning].
Place the test pattern on the exposure glass, and then press [Start Scanning].
The image will be corrected after “Scanning...Please wait.” disappears.
![]()
The test pattern will not be read if it is set in the ADF.
The test pattern will be printed on an A4
 , 81/2"
  11" size page. If A4 or 81/2" 11" is not available, B4 JIS
 , A3, or 11" 17" will be used. Make sure to check the paper set in the paper tray.
Set the test pattern in the following way:

Make sure to set the test pattern on the exposure glass, and then two or three white sheets, same size as the test pattern, above the test pattern.