Registering a New Custom Paper by Modifying an Existing Paper
You can open and modify the settings of a registered custom paper and register them as a new custom paper.
This function is useful when registering paper that is the same type as an existing paper, but a different size.
Depending on which settings you modify, details of a newly registered custom paper will be as follows:
When the settings of the selected custom paper are not changed:
The settings of the selected custom paper (“Name”, “Paper Size”, “Paper Type”, and “Paper Weight”, including the attributes specific to the color controller) are copied to the newly registered custom paper.
When the settings “Name”, “Paper Size”, “Apply Duplex”, “Apply Auto Paper Select”, or “Advanced Settings” of the selected custom paper are changed:
The changes are applied to the newly registered custom paper.
When the settings “Paper Type”, “Paper Color”, “Coated Paper Type”, “Prepunched Paper”, or “Paper Weight” of the selected custom paper are changed:
The changes are applied to the newly registered custom paper and its advanced settings are reset to their default values according to the changes that are applied to the settings.
When modifying a custom paper that is registered from the paper library, you can change its “Name”, “Paper Size”, “Apply Duplex”, and “Apply Auto Paper Select” settings. You can also confirm the paper name and the version of data.
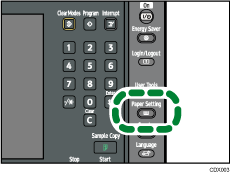
![]() Press the [Paper Setting] key.
Press the [Paper Setting] key.

The control panel on your machine might differ slightly from the control panel in this illustration.
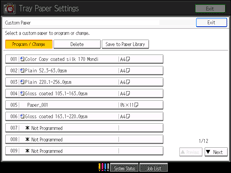
![]() Press [Custom Paper].
Press [Custom Paper].
![]() Select a number that is “
Select a number that is “![]() Not Programmed”.
Not Programmed”.
Press [![]() Previous] or [
Previous] or [![]() Next] to scroll through the list.
Next] to scroll through the list.

![]() Press [Custom Papers Reference].
Press [Custom Papers Reference].
![]() Select the custom paper whose settings you want to modify.
Select the custom paper whose settings you want to modify.
After selecting a custom paper, press [Check Modes] to check the type and weight of the selected paper.
![]() Press [Exit].
Press [Exit].
![]() Change the paper's name, size, and type, as necessary.
Change the paper's name, size, and type, as necessary.
When referring to a custom paper that is registered from the paper library, press [Check Product Name] to find the name of the paper.
If you do not change its name, the paper will be registered with the same name as the existing paper.
![]() Press [OK].
Press [OK].
![]() Press [Exit].
Press [Exit].
![]() Press the [Paper Setting] key.
Press the [Paper Setting] key.
You can also close the Tray Paper Settings screen by pressing [Exit].
![]()
For details about custom paper settings, see Custom Paper Settings
 .
.For details about “Advanced Settings”, contact your machine administrator.

