Cutting the Fore Edge
Use this function to cut the fore edge of a document after it is saddle stitched.
![]()
This function is available only when you select Center as the stapling position.
![]() Select Center as the staple position.
Select Center as the staple position.
For details about stapling, see "Finishing", Copy and Document Server Reference![]()
![]() .
.
![]() Press [Output/ Customize Function/ Finisher].
Press [Output/ Customize Function/ Finisher].

![]() Press [Fore Edge Cut].
Press [Fore Edge Cut].
![]() Specify the cut length width with [
Specify the cut length width with [![]() ] and [
] and [![]() ], and then press [OK].
], and then press [OK].
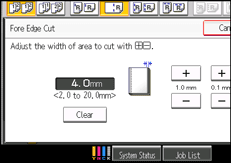
To change the value you entered, press [Clear] and then enter a new value.
![]() Press [OK].
Press [OK].
![]() Enter the number of copy sets using the number keys.
Enter the number of copy sets using the number keys.
![]() Place the originals, and then press the [Start] key.
Place the originals, and then press the [Start] key.
![]()
You can adjust the position of the fore edge cut from 2.0 to 20.0 mm (0.08 to 0.79 inches) in 0.1 mm (0.01 inch) increments.
Empty the trimmer tray if prints are ejected with waste paper stuck to them. For details, see Removing Waste Paper
 .
.For details about paper sizes, weights, and the number of sheets that can be cut by the trimmer, see Specifications for Trimmer Unit
.