
| |||
This section describes how to register an e-mail destination.
![]()
When using a e-mail destination as the sender, you must register the user code previously.
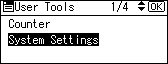
Press the [User Tools/Counter] key.
Select [System Settings] using [![]() ] or [
] or [![]() ], and then press the [OK] key.
], and then press the [OK] key.
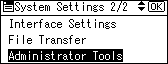
Select [Administrator Tools] using [![]() ] or [
] or [![]() ], and then press the [OK] key.
], and then press the [OK] key.
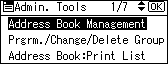
Select [Address Book Management] using [![]() ] or [
] or [![]() ], and then press the [OK] key.
], and then press the [OK] key.
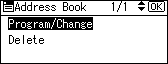
Select [Program/Change] using [![]() ] or [
] or [![]() ], and then press the [OK] key.
], and then press the [OK] key.
Enter the registration number you want to register using the number keys or the Quick Dial keys, and then press the [OK] key.
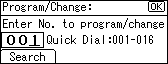
You can automatically specify registration numbers 001 - 016 by pressing the Quick Dial key.
Press [Search] to specify by name, destination list, registration number, user code, fax number, e-mail address, or folder destination.
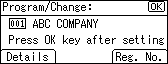
Press the [OK] key.
Press [Details].
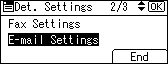
Select [E-mail Settings] using [![]() ] or [
] or [![]() ], and then press the [OK] key.
], and then press the [OK] key.
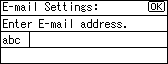
Enter the e-mail address using the number keys and the Quick Dial keys, and then press the [OK] key.
Select [E-mail/Internet Fax Dest.] or [Internet Fax Dest. only] using [![]() ] or [
] or [![]() ], and then press the [OK] key.
], and then press the [OK] key.

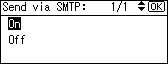
Select [On] or [Off] to specify whether or not SMTP server is to be used using [![]() ] or [
] or [![]() ], and then press the [OK] key.
], and then press the [OK] key.
Press [End].
Press the [OK] key.
Press the [User Tools/Counter] key.
![]()
You can enter up to 128 characters for the e-mail address.
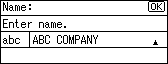
To register the name, see "Registering Names".
| Copyright (C) 2010 |