
| |||
This section describes how to change the registered NCP folder.
Press the [User Tools/Counter] key.
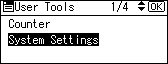
Select [System Settings] using [![]() ] or [
] or [![]() ], and then press the [OK] key.
], and then press the [OK] key.
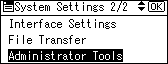
Select [Administrator Tools] using [![]() ] or [
] or [![]() ], and then press the [OK] key.
], and then press the [OK] key.
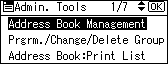
Select [Address Book Management] using [![]() ] or [
] or [![]() ], and then press the [OK] key.
], and then press the [OK] key.
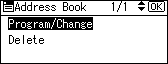
Select [Program/Change] using [![]() ] or [
] or [![]() ], and then press the [OK] key.
], and then press the [OK] key.
Enter the registration number you want to change using the number keys or the Quick Dial keys, and then press the [OK] key.
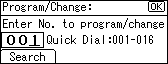
You can automatically specify registration numbers 001 - 016 by pressing the Quick Dial key.
Press [Search] to specify by name, destination list, registration number, user code, fax number, e-mail address, or folder destination.
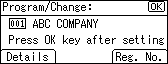
Press the [OK] key.
Press [Details].
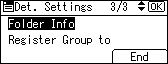
Select [Folder Info] using [![]() ] or [
] or [![]() ], and then press the [OK] key.
], and then press the [OK] key.
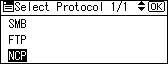
Select [NCP] using [![]() ] or [
] or [![]() ], and then press the [OK] key.
], and then press the [OK] key.
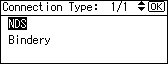
Select the connection type using [![]() ] or [
] or [![]() ], and then press the [OK] key.
], and then press the [OK] key.
If you want to specify a folder in an NDS tree, press [NDS]. If you want to specify a folder on a NetWare server, press [Bindery].
Select [Manual Entry] or [Browse Network] to specify the path entry method using [![]() ] or [
] or [![]() ], and then press the [OK] key.
], and then press the [OK] key.
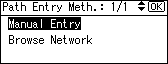
To specify a folder, you can either enter the path manually or locate the folder by browsing the network. See "Locating the folder manually" and "Locating the folder using Browse Network".
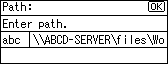
Specify the folder.
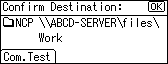
Press [Com.Test] to check the path is set correctly.
Press [Exit].

Press the [Escape] key.
Press [End].
Press the [OK] key.
Press the [User Tools/Counter] key.
![]()
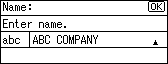
To change the name, see "Registering Names".
| Copyright (C) 2010 |