Programming/Changing Transfer Boxes
This section describes how to set up a Transfer Box.
This function turns the machine into a fax relay station. Documents sent with a SUB Code that matches the SUB Code programmed as a Transfer Box are received, and then relayed to a programmed receiver.
Since documents can be sent to multiple destinations in a single transfer request, you can economize on call charges when sending to distant destinations.
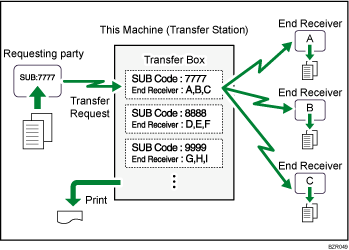
Inform the Requesting Party of the SUB Code assigned to the Transfer Box. When they want to have a document transferred by your machine, ask them to send the document using SUB Code Transmission and specify this SUB Code. If a password has also been programmed, inform them of this too, and ask them to enter it as the SID code.
You can store the following items:
Box Name (required)
Up to 20 characters.
SUB Code (required)
Up to 20 characters long and can be composed of digits [0]-[9], [
 ], [
], [ ], and spaces (the first character cannot be a space).
End Receiver (required)
You can store five End Receivers (destinations to which documents are forwarded) for each box. Specify End Receivers using a single or group destination programmed in the destination list beforehand.
Password (optional)
Up to 20 characters long and can be composed of digits [0]-[9], [
 ], [
], [ ], and spaces (the first character cannot be a space).
When programming a password, a mark is displayed in front of the Box name.
![]() Press [Facsimile Features].
Press [Facsimile Features].
![]() Press [General Settings].
Press [General Settings].
![]() Press [Box Setting].
Press [Box Setting].
![]() Check that [Program / Change] is selected.
Check that [Program / Change] is selected.
![]() Select the box to program.
Select the box to program.
When programming a new box, press [Not Programmed].
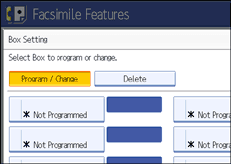
To change a box already programmed, press it, and then proceed to step 8.
![]() Press [Transfer Box].
Press [Transfer Box].
![]() Enter a Box name, and then press [OK].
Enter a Box name, and then press [OK].
![]() Enter a SUB Code.
Enter a SUB Code.
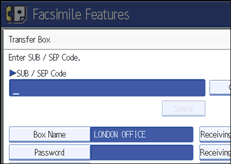
To change the SUB Code, press [Clear], and then try again. To change Box name, press [Box Name], and then repeat from step 7.
![]() To program End Receivers, select a Receiving Station.
To program End Receivers, select a Receiving Station.
You can store five Receiving Stations.
![]() Specify End Receivers with Destination keys, and then press [OK].
Specify End Receivers with Destination keys, and then press [OK].
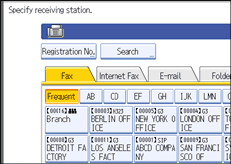
Press the transmission type tab to switch the destination between fax number, Internet Fax destination, e-mail address, and folder destination.
IP-Fax destination appears in the fax destination list.
A reception station can also be registered as a group destination. In such a case, a maximum of 498 parties including End Receivers 1-5 can be specified in a group.
![]() To program a password, press [Password].
To program a password, press [Password].
If you do not want to program a password, proceed to step 14.
![]() Enter a password, and then press [OK].
Enter a password, and then press [OK].
If you make a mistake, press [Clear] before pressing [OK], and then try again.
![]() Re-enter the password, and then press [OK].
Re-enter the password, and then press [OK].
If you make a mistake, press [Clear] before pressing [OK], and then try again.
To change the password after pressing [OK], press [Password] and repeat step 12 and 13, or press [Cancel] and repeat from step 11.
![]() Press [Security].
Press [Security].
If not specifying the security function, proceed to step 17.
Security is set to use S/MIME authentication. For details about the security settings, consult your administrator.
![]() Select the security functions.
Select the security functions.
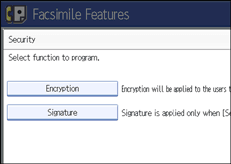
To specify encryption for documents for transfer to receiving station, press [Encryption]. To use the encryption function, the address must be stored in the Address Book and have the encryption option enabled. For details about Encryption, consult your administrator.
To attach a signature to documents for documents for transfer to receiving station, press [Signature]. For details about Signature, consult your administrator.
![]() Press [OK].
Press [OK].
![]() Press [OK].
Press [OK].
![]() Press [Exit].
Press [Exit].
![]() Press the [User Tools/Counter] key.
Press the [User Tools/Counter] key.
![]()
After documents are transferred, SUB Code Transfer Report is not sent back to the sender.
You can set the fax destination, IP-Fax destination, Internet Fax destination, e-mail destination, or folder destination, as a reception station.
If you have specified folder destination for the transmission destination, you can specify the file format used for transferring to receiving station. See “Parameter Settings” (switch 21, bit 3).
After documents are transferred, they are deleted.
When this function is enabled, the machine will print the documents it transfers and a SUB Code Transfer Report each time it completes a transfer. You can disable printing of the report using User Parameters. See “Parameter Settings” (switch 04, bit 1).
You can edit boxes in the same way you program them.
If you delete a destination specified as a reception destination using the destination list, the settings of the reception destination are also deleted, so they must be registered again. When a destination is changed, a document is transmitted to the new destination. If there is no destination of the specified type, you can set which destination to be used as an alternative destination. See “Parameter Settings” (switch 32, bit 0).
Select [Encrypt All] in the encryption settings and encrypted e-mail is sent regardless of the encryption settings in [Security]. For details about encryption, consult your administrator.
The electronic signature is limited in the following ways, depending on the S/MIME settings on Web Image Monitor. For details about the electronic signature, consult your administrator.
If [Set Individually] is set:
You can set [Signature] in [Security] and attach an electronic signature to email for every transmission.
If [Do not Use Signatures] is set:
Even if you press [Security], [Signature] does not appear.
If [Use Signatures] is set:
An electronic signature is attached when you send email. The [Signature] setting in [Security] cannot be cancelled.

