
| |||
This section introduces the names and functions of the parts on the front and left sides of the printer.
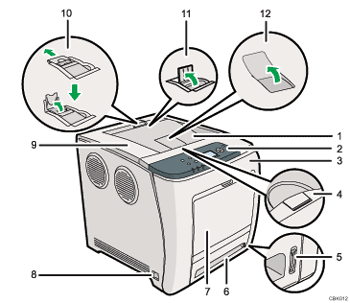
Standard Tray
Output is stacked here with the print side down.
Control Panel
Contains keys for printer control and a display that shows the printer status.
Front Cover
Open this cover to when replacing the waste toner bottle etc. or removing jammed paper.
Pull the right side lever to open the front cover.
Top Cover Open Lever
Pull this lever upward to open the top cover.
Remaining Paper Indicator
Indicates the approximate amount of paper remaining in the tray.
Standard Paper Feed Tray (Tray 1)
Up to 500 sheets of plain paper can be loaded.
Bypass Tray
Up to 100 sheets of plain paper can be loaded.
Power Switch
Use this switch to turn the power on and off.
Top Cover
Open this cover to replace the print cartridge.
Stop Fence (Legal-size prints)
Raise the rear fence (by pulling it in the direction of the arrow) to stop Legal-size prints falling behind the printer.
Stop Fence (A4/Letter-size prints)
Raise the front fence to stop A4/Lettersize prints falling behind the printer.
Standard Tray Extension
Use this to support sheets that come out curled after they are printed.
Flip open the extension by pushing down on the end that is toward the rear of the printer.
![]()
For details about the messages which appear on the screen to prompt you to replace the units, see "Error and Status Messages Appear on the Control Panel".
| Copyright (C) 2010 |