Setting the Gradation Correction Value
The following procedure describes adjusting the gradation correction value.
During printing, you can correct the gradation in two areas: bright part (highlight) and the medium (middle). The correction values for the highlight and the medium parts are set using [Print Test Pattern 1] and [Print Test Pattern 2] respectively.
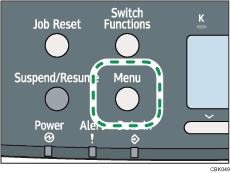
![]() Press the [Menu] key.
Press the [Menu] key.

![]() Press the [
Press the [![]() ] or [
] or [![]() ] key to select [Maintenance], and then press the [OK] key.
] key to select [Maintenance], and then press the [OK] key.

![]() Press the [
Press the [![]() ] or [
] or [![]() ] key to select [Quality Maintenance], and then press the [OK] key.
] key to select [Quality Maintenance], and then press the [OK] key.

![]() Press the [
Press the [![]() ] or [
] or [![]() ] key to select [Color Calibration], and then press the [OK] key.
] key to select [Color Calibration], and then press the [OK] key.

![]() If you want to perform only auto color adjusting, press the [
If you want to perform only auto color adjusting, press the [![]() ] or [
] or [![]() ] key select [Adjust Auto Density], and then press the [OK] key.
] key select [Adjust Auto Density], and then press the [OK] key.

The confirmation message appears. Press [OK] to adjust Auto Density.
The confirmation message appears when complete. Press [Exit].
The display returns to the Color Calibration screen.
![]() In the Color Calibration menu, press the [
In the Color Calibration menu, press the [![]() ] or [
] or [![]() ] key to select [Print Test Pattern 1] or [Print Test Pattern 2], and then press the [OK] key.
] key to select [Print Test Pattern 1] or [Print Test Pattern 2], and then press the [OK] key.

A confirmation message appears. Press [Print].
To cancel printing, press [Cancel].
![]() Compare the colors printed on gradation correction sheet 1 with the colors you want to reproduce.
Compare the colors printed on gradation correction sheet 1 with the colors you want to reproduce.
For details about the gradation correction sheet, see "Viewing the Gradation Correction Sheet".
![]() When the selected sheet is printed, a confirmation message will appear. Press [Continue].
When the selected sheet is printed, a confirmation message will appear. Press [Continue].
If you want to exit from this menu, press [Exit].
![]() Press the [
Press the [![]() ] or [
] or [![]() ] key to select the color you want to adjust, and then press the [OK] key.
] key to select the color you want to adjust, and then press the [OK] key.

![]() Adjust the correction value for the selected color, and then press the [OK] key.
Adjust the correction value for the selected color, and then press the [OK] key.

![]() Press [Result].
Press [Result].

![]() Carefully look over gradation correction sheet 1, which you have just printed. Adjust the values of the colors you want to reproduce on prints so they match the colors on gradation correction sheet 1.
Carefully look over gradation correction sheet 1, which you have just printed. Adjust the values of the colors you want to reproduce on prints so they match the colors on gradation correction sheet 1.
![]() After printing, press [Yes] to save the settings.
After printing, press [Yes] to save the settings.
![]() Select [Print Test Pattern 2] to print gradation correction sheet 2. Adjust the midtones on gradation correction sheet 2 by repeating the procedure you used to adjust the color values on gradation correction sheet 1.
Select [Print Test Pattern 2] to print gradation correction sheet 2. Adjust the midtones on gradation correction sheet 2 by repeating the procedure you used to adjust the color values on gradation correction sheet 1.
![]() After completing all settings, press the [Menu] key to return to the initial screen.
After completing all settings, press the [Menu] key to return to the initial screen.

