

  |  | ||
![]()
One end receiver can be registered for each special sender. To register two or more end receivers, use group destination. However, a maximum of 498 destinations can be specified in a group.
Press [Facsimile Features].
Press [Reception Settings].
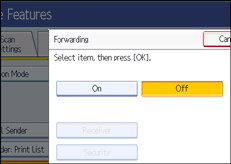
Press [Forwarding].
Press [On].

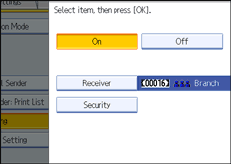
If there is an End Receiver already programmed, a receiver name is shown. If you want to change the receiver, press [Receiver] and proceed to step 5.
To cancel Forwarding, press [Off] and proceed to step 9.
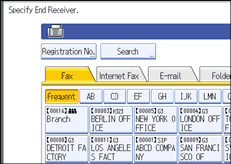
Specify an End Receiver using the destination list, and then press [OK].

Press the transmission type tab to switch the destination between fax number, Internet Fax destination, e-mail address, and folder destination.
IP-Fax destination appears in the fax destination list.
Set an e-mail destination in Address Book Management under Administrator Tools in the System Settings menu. See “E-mail Destination”, Network and System Settings Reference.
Set a folder destination in Address Book Management under Administrator Tools in the System Settings menu. See “Registering Folders”, Network and System Settings Reference.
If you have specified folder destination for forwarding, you can specify the file format used for forwarding. See “Parameter Settings” (switch 21, bit 3).
If you make a mistake, press [Clear] before pressing [OK], and then try again.
Press [Security].
If not specifying the security function, proceed to step 9.
Security is set to use S/MIME authentication. For details about the security settings, consult your administrator.

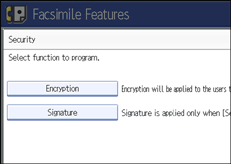
Select the security functions.
To specify encryption for documents for Forwarding, press [Encryption]. To use the encryption function, the address must be stored in the Address Book and have the encryption option enabled. For details about Encryption, consult your administrator.
To attach a signature to documents for Forwarding, press [Signature]. For details about Signature, consult your administrator.

Press [OK].
Press [OK].
Press the [User Tools/Counter] key.
![]()
Select [Encrypt All] in the encryption settings and encrypted e-mail is sent regardless of the encryption settings in [Security]. For details about encryption, consult your administrator.
The electronic signature is limited in the following ways, depending on the S/MIME settings on Web Image Monitor. For details about the electronic signature, consult your administrator.
If [Set Individually] is set:
You can set [Signature] in [Security] and attach an electronic signature to email for every transmission.
If [Do not Use Signatures] is set:
Even if you press [Security], [Signature] does not appear.
If [Use Signatures] is set:
An electronic signature is attached when you send email. The [Signature] setting in [Security] cannot be cancelled.