

  |  | ||
This section describes the user tools in the General Features menu under System Settings.
Program / Change / Delete User Text
You can register text phrases you often use when specifying settings, such as ".com" and "Regards".
You can register up to 40 entries.
Program / Change
Press the [User Tools/Counter] key.
Press [System Settings].
Check that [General Features] is selected.
Press [Program / Change / Delete User Text].
Check that [Program / Change] is selected.
Select the user text you want to change.
To program new user text, press [*Not Programmed].
Enter the user text, and then press [OK].
Enter the user text using up to 80 characters.
Press [Exit].
Press the [User Tools/Counter] key.
Delete
Press the [User Tools/Counter] key.
Press [System Settings].
Check that [General Features] is selected.
Press [Program / Change / Delete User Text].
Press [Delete].
Select the user text you want to delete.
Press [Yes].
Press [Exit].
Press the [User Tools/Counter] key.
Panel Key Sound
The beeper (key tone) sounds when a key is pressed.
Default: [Medium]
Warm-up Beeper (copier/Document Server)
You can have the beeper sound when the machine becomes ready to copy after leaving Energy Saver mode, or when the power is turned on.
Default: [On]
If the Panel Key Sound setting is [Off], the beeper does not sound, whatever the Warm-up Beeper Notice setting.
Copy Count Display (copier/Document Server)
The copy counter can be set to show the number of copies made (count up) the number of copies yet to be made (count down).
Default: [Up]
Function Priority
Specify the mode to be displayed immediately after the operation switch turned on, or when System Reset mode is turned on.
Default: [Copier]
Print Priority
Print Priority is given to the mode selected.
Default: [Display Mode]
When [Interleave] is selected, the current print job will be interrupted after maximum of five sheets.
Function Reset Timer
You can set the length of time the machine waits before changing modes when using the multi-access function.
This is useful if you are making many copies and have to change settings each copy. If you set a longer reset period, you can prevent interruption from other functions.
Default: [Set Time], [3 second(s)]
When you select [Set Time], enter the time (3-30 seconds, in 1 second increments) using the number keys.
The Function Reset Timer setting is ignored if [Interleave] or [Job Order] is set for Print Priority.
Output: Printer
Specify a tray to which documents are delivered.
Default: [Upper Paper Exit]
Key Repeat
You can enable or disable repetition of an operation if a key on the screen or control panel is pressed continuously.
Default: [Normal]
System Status/Job List Display Time
Specify how long to display the System Status and Job List display for.
Default: [On], [15 second(s)]
By selecting [On], you can specify a display time between 10 and 999 seconds.
Interleave Print
You can set the timing for changing modes when [Print Priority] has been set [Interleave].
Default: [10 sheet(s)]
You can set the number from 1 to 20 sheets using the number keys.
Feed Start Method
Specify whether feeding starts automatically or after pressing the [Start] Key.
Default: [Auto]
Original Feed Delay 2
Specify the duration of the pause immediately after originals are first fed into the machine. If originals frequently feed in slanted, or you are using special originals, set the delay accordingly.
Default: [1 second(s)]
The time can be set from 1 to 5 seconds.
Original Feed Delay 1
Specify the duration of delay before an original is fed into the machine after being set. If originals frequently feed in slanted, or you are using special originals, set the delay accordingly.
Default: [1 second(s)]
The time can be set from 0 to 5 seconds.
Fine Ratio Adjustment: Copier
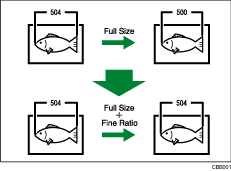
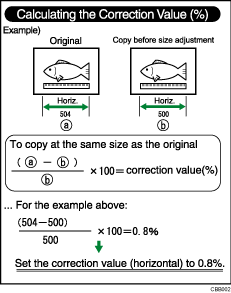
Depending on paper type, environment, and humidity, copy paper can expand or shrink slightly. This means that the size of the copy and the original do not match. if this happens, specify the vertical and horizontal correction ratio. You can specify this setting for each paper type (plain, translucent, film and recycled paper).

Default for Vertical: [0.0%] / Horizontal: [0.0%].
Specify the ratio between -1.0% and 1.0% (in 0.1% increments)
To set the Fine Ratio setting, measure the length of the original and the copy image to calculate the ratio.

Fine Ratio Adjustment: Printer
Specify the fine ratio when the optional printer is installed. Depending on paper type, environment, and humidity, copy paper can expand or shrink slightly. This means that the size of the copy and the original do not match.
When the horizontal ratios are almost the same and there are differences between the vertical ratios, you can specify the vertical correction ratio. You can make this setting for each paper type (plain, translucent, film and recycled paper).
Default: [0.0%]
Specify the ratio between -1.0% and 1.0% (in 0.1% increments).
For details about how to set the fine ratio, see "Fine Ratio Adjustment: Copier".
Adjust Scan Position
You can adjust the position of the scan area.
Default: [0]
Specify the scan position between -10 and +10 (in 1 increments).
Preview Area Settings
Specify the default settings of preview area, area size, and orientation for previewing stored document at the control panel.
This setting is effective when a preview of an enter image cannot be displayed due to document size.
Default for Area: [![]() ]
]
Default for Area Size: [Small]
Default for Landscape/Portrait: [![]() ]
]
Print Image Priority
You can prioritize either lines or gradation in printed images.
Default: [Thin Lines]
![]()
For details on how to access System Settings, see "Accessing User Tools".