Installing the ELP-NX Card
This section explains how to install the ELP-NX card. The following procedure applies to Type 2 model only.
![]()
|
![]()
To complete the installation process of the ELP-NX card, you must restart the printer.
Do not subject the card to physical shocks.
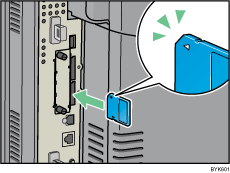
Use the lower slot for the SD card.
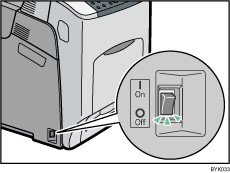
![]() Make sure the power switch is set to "
Make sure the power switch is set to "![]() Off", and then unplug the power cord.
Off", and then unplug the power cord.
![]() Remove the cover of the controller board's lower SD card slot.
Remove the cover of the controller board's lower SD card slot.

![]() Carefully push in the SD card (notched corner upward and leading), until it clicks into place.
Carefully push in the SD card (notched corner upward and leading), until it clicks into place.
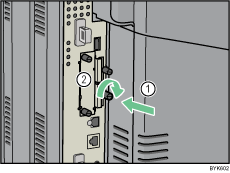
![]() Reattach the cover over the SD card. Fasten the screw to secure the cover.
Reattach the cover over the SD card. Fasten the screw to secure the cover.
![]() Insert the plug of the power cord securely into the wall outlet.
Insert the plug of the power cord securely into the wall outlet.
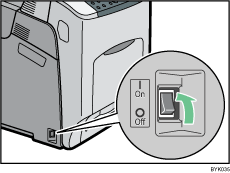
![]() Turn the power switch to "
Turn the power switch to "![]() On".
On".
The power indicator on the control panel lights up and the application installation process starts automatically. The initial screen will appear.
![]() Perform the shutdown procedure, and then turn the power switch to "
Perform the shutdown procedure, and then turn the power switch to "![]() Off".
Off".
![]() Turn the power switch to "
Turn the power switch to "![]() On".
On".
The power indicator on the control panel lights up.
![]()
Do not touch the card while the printer is in use. It may come loose, even if pushed only slightly. The slot cover must be reattached.
You can confirm that the ELP-NX card was installed correctly by checking Web Image Monitor. For details, see "Extended Feature Info", VM Card Extended Feature Settings Web Reference.
If the card is not installed properly, repeat the procedure from the beginning. If it cannot be installed correctly even after reattempting installation, contact your sales or service representative.