Exterior: Rear View
This section introduces the names and functions of the parts on the rear side of the printer.
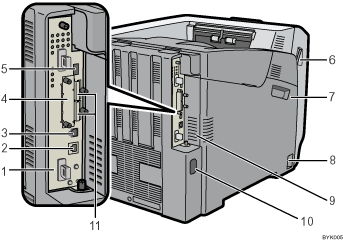
Controller Board
Slide this out to install options such as the memory unit or printer hard disk. Plug cables such as a USB cable and Ethernet cable into their connectors.
Ethernet Port
Use a network interface cable to connect the printer to a network.
USB Port B
Use a USB cable to connect the printer to a computer.
Optional Interface Board Slot
Insert an optional Wireless LAN interface unit, Gigabit Ethernet board, or 1284 interface board in this slot.
USB Port A
Use a USB cable to connect the printer to a digital camera.
Front Cover Open Levers
Pull these levers toward the front side of the printer to open the front cover.
Left Cover
Open this cover when replacing the drum unit, transfer unit or waste toner bottle.
Power Switch
Use this switch to turn the power on and off.
Vents
To prevent overheating, heat from internal components is released through these vents. Malfunctions and failure can result if these vents are blocked or obstructed.
The dustproof filter needs to be replaced regularly for proper maintenance.
Replace the dustproof filter when the following message appears:
“Replcmnt Rqrd:Fusing Unit”
Replace the dustproof filter and the fusing unit together.
Power Connector
Connect the power cord to the printer here. Insert the other end of the cable into a nearby wall outlet.
SD Card Slots
Remove the cover and install SD cards here. Install the data overwrite security unit, NetWare card or camera direct print card in the upper slot. Install the VM card or HDD encryption unit in the lower slot.
![]()
For details about the messages which appear on the screen to prompt you to replace the units, see "Error and Status Messages Appears on the Control Panel".