
| |||
This section explains how to attach or remove Multi Bypass Tray BY1020.
![]()
Be sure to disconnect the power cord before attaching the paper feed unit.
Do not forcefully press down on the multi bypass tray. It may come off the printer and paper misfeeds or positioning problems may result.
Attaching the multi bypass tray
Press and hold down the [Power] key on the printer until it turns off, and then unplug the power cord.
Disconnect the USB cable or Ethernet cable.
Take the multi bypass tray out of its box. Then, remove the tape from the multi bypass tray.
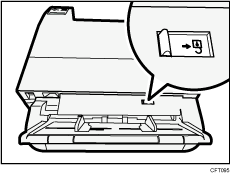
Attach the multi bypass tray until the lever for multi bypass tray attachment and detachment clicks.

Check that the unlock icon is displayed on the lever for multi bypass tray attachment and detachment.
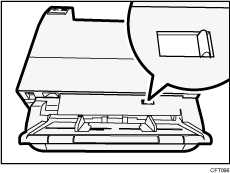
If the unlock icon is not displayed on the lever for multi bypass tray attachment and detachment or the lever is positioned halfway, the multi bypass tray is not attached properly. Attach it again.
Connect the power cord, USB cable, or Ethernet cable.
![]()
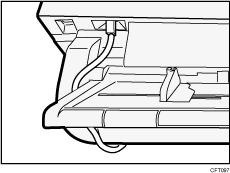
Do not place the USB cable between the printer and the multi bypass tray.
Do not place the USB cable over the upper edge of the multi bypass tray.
After attaching multi bypass tray, you must register where to start printing on paper loaded in the multi bypass tray.
After attaching the multi bypass tray, check that the printer driver can recognize the paper feed unit. If you are using a Windows, open the [Properties] dialog box of the printer driver and check the [Accessories] tab. If the multi bypass tray is not recognized, install it again. If you are using a Macintosh, select the printer you want to use from [Print & Fax] on the [System Preferences] window, and then open [info]. Open the [Driver] tab, and select the check box of the option you have installed.
Detaching the multi bypass tray
Press and hold down the [Power] key on the printer until it turns off, and then unplug the power cord.
Disconnect the USB cable or Ethernet cable.
Remove any paper in the bypass tray.
If the bypass tray extension is pulled out, push it back in.
To release the lock, push the lever for multi bypass tray attachment and detachment so the unlock icon is hidden.
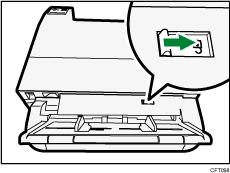
Detach the bypass tray.

| Copyright (C) 2008-2011 |