
| |||
This section explains how to attach or remove Paper Feed Unit TK1140.
![]()
|
![]()
Be sure to disconnect the power cord before attaching the paper feed unit.
Attaching the paper feed unit
Press and hold down the [Power] key on the printer until it turns off, and then unplug the power cord.
Disconnect the USB cable or Ethernet cable.
Take the paper feed unit out of the box, and remove the tape.
Position the paper feed unit close to the printer.
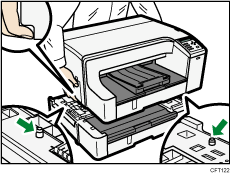
Align the connecting parts of the printer and paper feed unit, and then lower the printer onto the paper feed unit.
Grip the center area at the base of the printer's sides. Lift it slowly and do not strain your body.
Connect the power cord, USB cable, or Ethernet cable.
![]()
Align the paper feed unit and printer using their corners.
When the printer is placed on top of the paper feed unit, installation is complete.
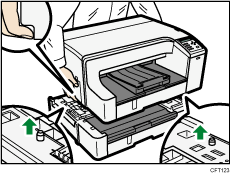
Do not tilt the printer.
Be careful not to trap your fingers.
After attaching the paper feed unit, you must register where to start printing on paper loaded in the paper feed unit.
After attaching the paper feed unit, check that the printer driver can recognize the paper feed unit. If you are using a Windows, open the [Properties] dialog box of the printer driver and check the [Accessories] tab. If the paper feed unit is not recognized, install it again. If you are using a Macintosh, select the printer you want to use from [Print & Fax] on the [System Preferences] window, and then open [info]. Open the [Driver] tab, and select the check box of the option you have installed.
Detaching the paper feed unit
Press and hold down the [Power] key on the printer until it turns off, and then unplug the power cord.
Disconnect the USB cable or Ethernet cable.
Remove the printer and place it on a nearby flat and stable surface, and then remove the paper feed unit from the place where the printer was installed.
Grip the center area at the base of the printer's sides. Lift it slowly and do not strain your body.
Place the printer in the previous place.
Connect the power cord, USB cable, or Ethernet cable.
![]()
Do not tilt the printer.
Be careful not to trap your fingers.
| Copyright (C) 2008-2011 |