Specifying Settings on the Control Panel
Make the following network settings according to the network interface you are using.
If you have connected the printer to a network, make the required network environment settings.
The following table shows the control panel settings and their default values. These items appear in the [Network Setup] menu.
Setting Name |
Value |
|---|---|
1.DHCP |
On |
2.IP Address |
GX e3300N/GX e7700N: 11.22.33.44 GX e3350N: 0.0.0.0 |
3.Subnet Mask |
0.0.0.0 |
4.Gateway Address |
0.0.0.0 |
5.Active Protocol |
TCP/IP: Active |
6.Ethernet Speed |
Auto Select |
7. Restore Default (GX e3300N/GX e7700N) |
None |
The following example explains making settings for TCP/IP.
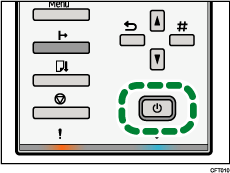
![]() Press the [Power] key.
Press the [Power] key.
![]() Press the [Menu] key.
Press the [Menu] key.
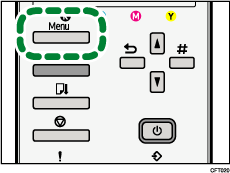
The Menu screen appears on the display.
![]() Press the [
Press the [![]() ] or [
] or [![]() ] key to display the [Host Interface] menu, and then press the [#Enter] key.
] key to display the [Host Interface] menu, and then press the [#Enter] key.
| Menu: Host Interface |
![]() Press the [
Press the [![]() ] or [
] or [![]() ] key to display [Network Setup], and then press the [#Enter] key.
] key to display [Network Setup], and then press the [#Enter] key.
| Host Interface: Network Setup |
![]() Press the [
Press the [![]() ] or [
] or [![]() ] key to select [IP Address], and then press [#Enter] key.
] key to select [IP Address], and then press [#Enter] key.
| Network Setup IP Address |
The current IP address appears on the display.
![]() Press the [
Press the [![]() ] or [
] or [![]() ] key to enter the left most entry field of the IP address, and then press the [#Enter] key.
] key to enter the left most entry field of the IP address, and then press the [#Enter] key.
| IP Address: |
To get an IP address for the printer, contact your network administrator.
The value moves by 10 if the [![]() ] or [
] or [![]() ] key is kept pressed.
] key is kept pressed.
When the [#Enter] key is pressed, the cursor moves to the next field.
![]() Press the [#Enter] key.
Press the [#Enter] key.
As the specified value is entered in each field, the cursor moves to the next field.
| IP Address: 192. |
![]() Repeating the steps, specify values in all fields, and then press the [#Enter] key.
Repeating the steps, specify values in all fields, and then press the [#Enter] key.
To return to the previous field, press the [Escape] key.
![]() Specify "Subnet Mask" and "Gateway Address" in the same way as when specifying the IP address.
Specify "Subnet Mask" and "Gateway Address" in the same way as when specifying the IP address.
![]() After you have made all the settings, press the [Online] key.
After you have made all the settings, press the [Online] key.
The specified settings are set and the initial printer screen reappears.
You can print the configuration page to confirm the specified settings.
![]()
For details about how to print a configuration page, see Printing a Configuration Page
 .
.