

  |  | ||
You can adjust the printing position of each tray. Use the following procedure to adjust the printing position.
![]()
A test page for checking the printing position will be output from the tray specified as a priority tray by [Tray Priority] under [PDL Settings]. Check that the tray you want to adjust is set as a priority tray before you perform the following procedure.
Press the [User Tools] key.

The menu screen appears.
Press the [![]() ][
][![]() ] keys to select [PDL Settings], and then press the [OK] key.
] keys to select [PDL Settings], and then press the [OK] key.
Press the [![]() ][
][![]() ] keys to select [List Print], and then press the [OK] key.
] keys to select [List Print], and then press the [OK] key.
Press the [![]() ][
][![]() ] keys to select [Test Page] or [Duplex Test Page], and then press the [OK] key.
] keys to select [Test Page] or [Duplex Test Page], and then press the [OK] key.
Print a duplex test page to adjust duplex printing position (Type 2 model only).
Press the [OK] key to print the test page to preview the settings.

Press the [User Tools] key.
Press the [![]() ][
][![]() ] keys to select [Machine Settings], and then press the [OK] key.
] keys to select [Machine Settings], and then press the [OK] key.
Press the [![]() ][
][![]() ] keys to select [User Registration], and then press the [OK] key.
] keys to select [User Registration], and then press the [OK] key.
Press the [![]() ][
][![]() ] keys to select the registration you want to adjust, and then press the [OK] key.
] keys to select the registration you want to adjust, and then press the [OK] key.
Press the [![]() ][
][![]() ] keys to set the registration value (mm).
] keys to set the registration value (mm).
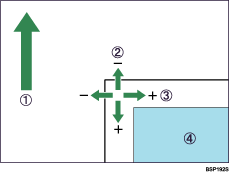
Increase the value to shift the print area in the positive direction, and decrease to shift in the negative direction. Adjust the margins of the test page so that they are equal in size.

Feed Direction
Vertical Adjustment
Horizontal Adjustment
Print Area
You can set the value between -15 mm and +15 mm in 1.0 mm increments.
Press the [Clear/Stop] key to return to the initial screen.
Repeat the step 1. to 5. to confirm the adjustment result.
Press the [Clear/Stop] key.
The display returns to the initial screen.
![]()
For details about [Tray Priority], see PDL Settings.