Registering an E-mail Destination
This section describes how to register an e-mail destination.
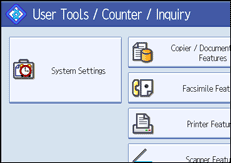
![]() Press [System Settings].
Press [System Settings].
![]() Press [Administrator Tools].
Press [Administrator Tools].
![]() Press [Address Book Management].
Press [Address Book Management].
![]() Check that [Program / Change] is selected.
Check that [Program / Change] is selected.
![]() Select the name whose e-mail address you want to register.
Select the name whose e-mail address you want to register.
Press the name key, or enter the registered number using the number keys.
![]() Press [E-mail].
Press [E-mail].
![]() Press [Change] under "E-mail Address".
Press [Change] under "E-mail Address".
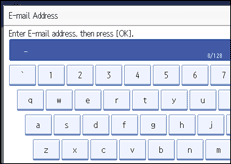
![]() Enter the e-mail address.
Enter the e-mail address.
![]() Press [OK].
Press [OK].
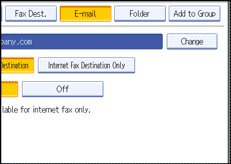
![]() Select [E-mail / Internet Fax Destination] or [Internet Fax Destination Only].
Select [E-mail / Internet Fax Destination] or [Internet Fax Destination Only].
If [E-mail / Internet Fax Destination] is specified, registered e-mail addresses appear in both the internet fax address display and E-mail address display on the fax function screen, and in the address display on the scanner function screen.
If [Internet Fax Destination Only] is specified, registered e-mail addresses only appear in the internet fax display on the fax function screen.
![]() If you want to use Internet fax, specify whether or not to use "Send via SMTP Server".
If you want to use Internet fax, specify whether or not to use "Send via SMTP Server".
![]() Press [OK].
Press [OK].
![]() Press [Exit].
Press [Exit].
![]() Press the [User Tools/Counter] key.
Press the [User Tools/Counter] key.
![]()
You can enter up to 128 characters for the e-mail address.
To register the name, see "Registering Names".