Send Settings
This section describes the user tools in the Send Settings menu under Facsimile Features.
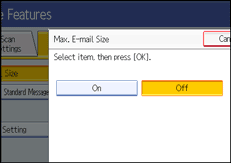
Max. E-mail Size
When the other party has a limit on the size of e-mail messages that can be received, or sending data heavy e-mail causes problems, you can make settings to limit the size of sent e-mail. When this function is set to on, transmission of e-mail that exceeds the set size is aborted.
The default setting is Off.
When e-mail exceeds the maximum file size, an Error Report is output, and the e-mail is deleted.
Even when e-mail does not exceed the size limit, it may be rejected if it does not meet the requirements of the server settings.
Press [Facsimile Features].
Press [Send Settings].
Press [Max. E-mail Size].
Press [On].
Enter the maximum e-mail size using the number keys.
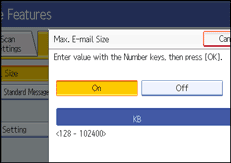
Maximum e-mail size can be between 128 and 102,400 KB.
If you make a mistake, press [Clear] or the [Clear/Stop] key, and then enter again.
Press [OK].
Program / Change / Delete Standard Message
Program standard messages to be printed at the top of the first page of the original of the opposite party. It is useful for personalizing messages such as sending greetings.
You can program three standard messages. You cannot change the "Confidential", "Urgent", "Please phone", or "Copy to corres. section" messages.
The procedure is the same for both programming and changing.
For details about how to enter the text, see "Entering Text", About this Machine.
Press [Facsimile Features].
Press [Send Settings].
Press [Program / Change / Delete Standard Message].
Check that [Program / Change] is selected.
To delete the registered message, press [Delete].
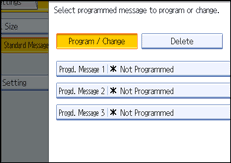
Select the message you want to program or change.
To delete the registered message, select the message you want to delete, and then press [Delete].
Enter a new message.
For details about entering text, see "Entering Text", About This Machine.
Press [OK].
To cancel a registration, press [Cancel].
Press [Exit].
Press the [User Tools/Counter] key.
Backup File TX Setting
You can specify whether or not to send to a selected folder the backup of a file sent by Memory Transmission.
By setting [Backup File TX Setting] to [On] and selecting the destination folder, you can automatically send to the selected folder the backup of a file sent by Memory Transmission using the machine's control panel, Web Image Monitor, or LAN-Fax.
Select the destination folder for the backup file from the address book.
The default setting is Off.
If you set [Backup File TX Setting] to [On] but the Backup File TX fails, the machine automatically prints a backup file TX communication failure report.
The backup file format will be the same as that specified for files forwarded to folder destinations. Using the parameter settings (switch: 21, bit: 3), select TIFF or PDF as the format for sending a file. The format is factory-preset to TIFF.
Using the parameter settings, you can specify the redial interval (switch: 35, bits: 0-7) and the maximum number of redials (switch: 36, bits: 0-7). The redial interval is factory-preset to 15 minutes; the maximum number of redials, to 192.
Using the parameter settings, (switch: 37, bit: 0) you can specify whether to stop sending a backup file if the destination folder becomes full while the machine is sending or waiting to send a fax or the backup file.
Press [Facsimile Features].
Press [Send Settings].
Press [Backup File TX Setting].
Press [On].
If there is a folder already programmed, a folder name is shown. If you want to change the folder, press [Folder] and proceed to step 5.
Specify a folder for back up, and then press [OK].
The folder name is shown to the right of [Folder].
Press [OK].
Press the [User Tools/Counter] key.