

  |  | ||
Use the following procedure to adjust the position of the image if it is out of alignment.
To adjust the image position, change the distance between the edges of the paper and the edges of the image. This procedure explains how to use [Frame Image] to adjust the image position.
Press the [User Tools] key.
Press [Adjustment Settings for Operators].
Press [0106 Select Test Pattern for Image Position Adjustment].
Press [Test Pattern].
Select [Frame Image], and then press [OK].
Press [Back].
Press [To Print Screen].
The default screen appears.
Press [Print Finishing Sample].
Select the paper tray whose alignment you want to check.
Select [Sample Output Tray] for [Output Tray], and then press [Start Printing].
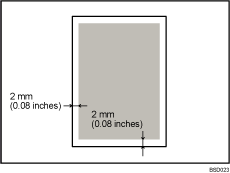
The Frame Image for checking the alignment is printed.
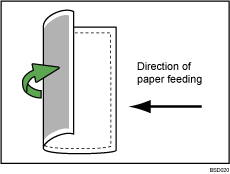
The Frame Image is printed on the back side of the sheet, so turn the sheet over.

Measure the distance between the sheet's left and bottom sides and the Frame Image. The optimum aligned distance is 2 mm (0.08 inches). Use the following steps to adjust the print position according to the degree of misalignment.

Press [Back to Settings].
Press [0101 Adjust Image Position Across Feed Direction] or [0102 Adjust Image Position With Feed Direction].
[0101 Adjust Image Position Across Feed Direction]: Vertical alignment relative to paper feed direction.
[0102 Adjust Image Position With Feed Direction]: Horizontal alignment relative to paper feed direction.
Select the paper tray you want to adjust, and then specify the value using the [![]() ] and [
] and [![]() ].
].
Press [OK], and then press [Back].
Repeat steps 7 to 16 until the distances between the paper sides and the Frame Image are between 1.5 and 2.5 mm (0.06 and 0.10 inches).