
| |||
Follow the procedure below to print a test pattern and adjust the print head positions if vertical lines are printed unaligned or printed colors look blurred.
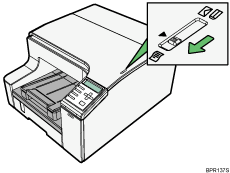
Slide the envelope selector to ![]() the forward position.
the forward position.
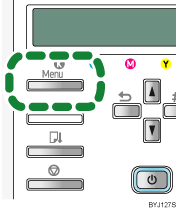
Press the [Menu] key.
Press the [![]() ] or [
] or [![]() ] key to display [Maintenance], and then press the [#Enter] key.
] key to display [Maintenance], and then press the [#Enter] key.
| Menu: Maintenance |
Press the [![]() ] or [
] or [![]() ] key to display [Head Position], and then press the [#Enter] key.
] key to display [Head Position], and then press the [#Enter] key.
| Maintenance: Head Position |
Press the [![]() ] or [
] or [![]() ] key to display [Pr.Test Pattern], and then press the [#Enter] key.
] key to display [Pr.Test Pattern], and then press the [#Enter] key.
| Head Position: Pr.Test Pattern |
Press the [![]() ] or [
] or [![]() ] key to select a test pattern, and then press the [#Enter] key.
] key to select a test pattern, and then press the [#Enter] key.
| Pr.Test Pattern: High Speed |
To adjust print head positions for all resolutions, repeat this procedure selecting the other resolution.
A test pattern to adjust print head positions is printed.
Check the optimal adjustment values on the printed test pattern.
The optimal adjustment value is the column number above the square that is between the straight vertical lines and that is the lightest shade of gray. If the column number for the "A" line is "+2", the optimal adjustment value is for "A" is "+2".

Press the [![]() ] or [
] or [![]() ] key to display [Adjustment], and then press the [#Enter] key.
] key to display [Adjustment], and then press the [#Enter] key.
Press the [![]() ] or [
] or [![]() ] key to select a resolution from step 5, and then press the [#Enter] key.
] key to select a resolution from step 5, and then press the [#Enter] key.
| Adjustment: High Speed |
Press the [![]() ] or [
] or [![]() ] key to select a line, and then press the [#Enter] key.
] key to select a line, and then press the [#Enter] key.
| Adjustment: 1.A |
Enter the optimal adjustment values from step 6, and then press the [#Enter] key.
| A: (-4, +4) 0 |
Press the [Online] key.
The initial screen appears.
| Copyright (C) 2008,2009 |