Erase Inside
Use this function to copy the original while erasing a specified area.
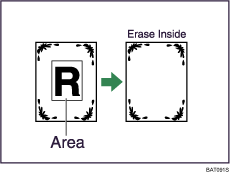
To specify the area you want to erase, you have to define the value of X1, Y1, X2, and Y2 on the original. Measure the area you want to specify before entering the area settings.
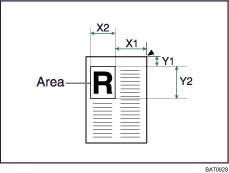
X1, X2: 0 - 432 mm (0 - 17 inches)
Y1, Y2: 0 - 432 mm (0 - 17 inches)
![]() Specify the point where the machine starts scanning (X1, Y1) and where its tops scanning (X2, Y2).
Specify the point where the machine starts scanning (X1, Y1) and where its tops scanning (X2, Y2).
![]() Press [Edit / Stamp].
Press [Edit / Stamp].
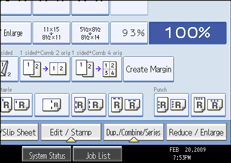
![]() Press [Erase].
Press [Erase].
![]() Select one of the areas from [Erase Inside 1] to [Erase Inside 5].
Select one of the areas from [Erase Inside 1] to [Erase Inside 5].
![]() Enter the length of [X1] with the number keys, and then press [
Enter the length of [X1] with the number keys, and then press [![]() ].
].
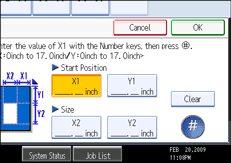
![]() Enter the length of [Y1] with the number keys, and then press [
Enter the length of [Y1] with the number keys, and then press [![]() ].
].
![]() Enter the length of [X2] with the number keys, and then press [
Enter the length of [X2] with the number keys, and then press [![]() ].
].
![]() Enter the length of [Y2] with the number keys, and then press [
Enter the length of [Y2] with the number keys, and then press [![]() ].
].
If you want to erase the image on the back side of the original, press [2 Sided Setting] and then [Back].
Erasing the image on the back side is valid when you copy 2-Sided originals.
![]() Press [OK].
Press [OK].
![]() To specify multiple areas, select areas 1 to 5, and then repeat steps 4 to 9.
To specify multiple areas, select areas 1 to 5, and then repeat steps 4 to 9.
![]() Press [OK].
Press [OK].
![]()
To change the value you entered, press the key you want to change, and then enter a new value.
By combining “Erase Inside 1” - “Erase Inside 5”, you can erase up to 5 areas at the same time.