Top Page > Hardware Guide > Paper and Other Media > Paper Recommendations > Types of Paper and Other Media > Types of paper
Types of paper
Paper Type |
Thickness (g/m2) |
Duplex |
Enabled paper feeding tray |
Note |
Tray 1 |
Tray 2 |
Thin Paper (60-74g/m2) |
60-74 |

|

|

|
|
Plain Paper 1 |
75-90 |

|

|

|
|
Plain Paper 2 (91-105g/m2) |
91-105 |

|

|

|
|
Recycled Paper |
75-90 |

|

|

|
|
Color Paper |
75-90 |

|

|

|
Preprinted Paper |
75-90 |

|

|

|
Prepunched Paper |
75-90 |

|

|

|
Thick Paper 1 (106-160g/m2) |
106-160 |

|

|

|
|
Letterhead |
75-90 |

|

|

|
|
Bond Paper |
105-160 |

|

|

|
The number of sheets that can be printed in one minute is approximately half that of Plain Paper 1. If the paper thickness is outside the specified range, select Plain Paper 2 (91-105 g/m2).
|
Cardstock |
105-160 |

|

|

|
|
Label Paper |
|

|

|

|
|
Envelope |
|

|

|

|
The number of envelopes that can be printed in one minute is approximately half that of Plain Paper 1. To prevent the envelopes becoming creased, go to the [Setup] tab and select [Rotate by 180 degrees] for [Orientation:] when printing. If printed envelopes come out badly creased, load the envelopes in the opposite direction. Also, configure the printer driver to rotate the print object 180 degrees. Load envelopes print side down in the bypass tray. 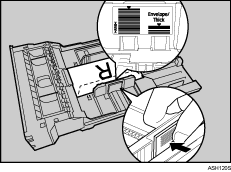
The loading orientation of envelopes depends on the type of envelope. To load envelopes that open along the short edge, open out their flaps and place the envelopes so that their flaps point toward the back of the tray. To load envelopes that open along the long edge, fold their flaps under (as if closed) and place the envelopes so that their flap edges are flush against the right side paper guide. 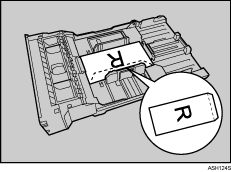
To correctly specify the length of an envelope whose flap opens along its short edge, be sure to include the open flap when measuring. 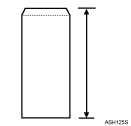
Environmental factors can degrade the print quality on both recommend and non-recommended envelopes. Fan envelopes, and then align their edges before loading. 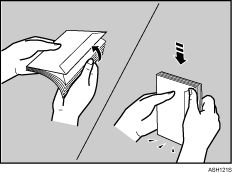
When fanning envelopes, make sure they are not stuck together. If they are stuck together, separate them. When fanning envelopes, make sure the envelope flaps are not stuck together. If they are stuck together, separate them. Before loading envelopes, flatten them out so that their curl does not exceed that shown in the illustration below. 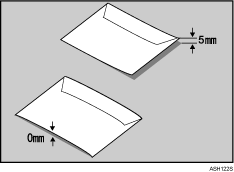
If the curl is severe, flatten out the envelopes using your fingers, as shown in the illustration below. 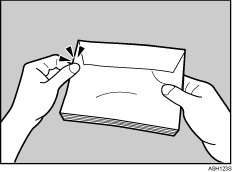
If envelopes are severely curled after printing, flatten them by bending them back against the curl. After printing, envelopes sometimes have creases along their long edges and toner smear on their unprinted sides. Their print images might also be blurred. When printing large, black-solid areas, striping can occur as a result of the envelopes overlapping.
|


