
| |||
Prints files received with Memory Lock.
This is a security function designed to prevent unauthorized users from reading your documents. If Memory Lock is switched on, all received documents are stored in memory and are not automatically printed.
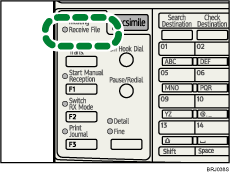
To print the documents, you have to enter the Memory Lock ID. When your machine has received a document with Memory Lock, the Receive File indicator blinks.
Before using this function, the following preparations are required in the Fax Features menu.
Program your Memory Lock ID under Program Memory Lock ID.
Set Memory Lock to On.
For details about these settings, see "Administrator Tools".
![]()
If the main power switch is turned off for about twelve hours, all documents protected by Memory Lock are deleted. When this happens, the Power Failure Report is printed so you can confirm which documents have been deleted. See "Turning Off the Main Power / In the Event of Power Failure", Troubleshooting.
Confirm that the Receive File indicator is blinking.
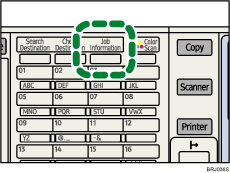
Press the [Job Information] key.
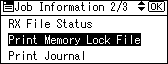
Select [Print Memory Lock File] using [![]() ] or [
] or [![]() ], and then press the [OK] key.
], and then press the [OK] key.
If no documents were received while Memory Lock was switched on, the message "There are no memory lock files." is shown, and then the display returns to that of step 3.
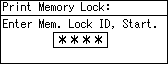
Enter a 4-digit Memory Lock ID with the number keys, and then press the [Start] key.
If the Memory Lock ID does not match, the "Specified code does not match the programmed Memory Lock ID." message appears, and then the display returns to the previous screen. Retry after checking the Memory Lock ID.
Press the [Escape] key.
The standby display appears.
![]()
Even when Memory Lock is available, if free memory is insufficient, reception is not possible.
You can also apply a Memory Lock to documents that come only from certain senders.
Documents received by SEP Code Reception are automatically printed even if this function is switched on.
If you print a Memory Lock File, it is deleted.
| Copyright (C) 2008 |