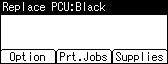
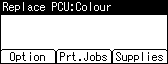
Replacing the Black Drum Unit/Color Drum Units
Replace the black drum unit/color drum units if any of the following messages appear on the display:
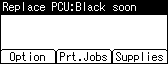
When the following messages appear on the display, the black drum unit/color drum units should be replaced soon. Prepare a new Black Drum Unit/Color Drum Unit.

![]()
Exposure to light reduces black drum unit/color drum units performance. Replace the unit as quickly as possible.
Do not pull out the black drum unit/color drum units quickly or with force as it may fall.
Take care that nothing comes into contact with the top surface of the black drum unit/color drum units.
When holding the black drum unit/color drum units, grab the green grip on the left and the handle on the front together. Do not move the black drum unit/color drum units by only grabbing the grip. Doing so may damage the grip.
Place no objects on the front or inner cover.
The following is the replacement procedure for the yellow drum unit located at the left end. This procedure applies to the replacement of other drum units.
![]() Turn off the printer and unplug the power cable.
Turn off the printer and unplug the power cable.
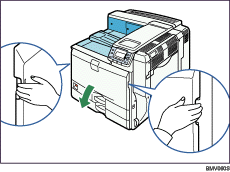
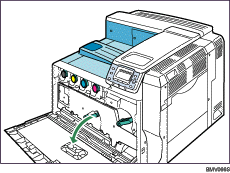
![]() Holding the left and right side grips, carefully open the front cover.
Holding the left and right side grips, carefully open the front cover.
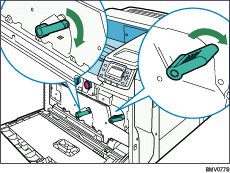
![]() Turn the two green levers counterclockwise.
Turn the two green levers counterclockwise.

![]() Pulling the handle, slowly open the inner cover.
Pulling the handle, slowly open the inner cover.
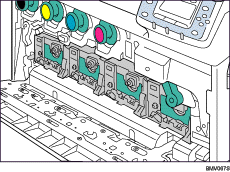
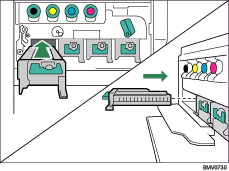
The drum units are installed as shown. From the left, the units are attached in the order of yellow (Y), cyan (C), magenta (M), and black (K).
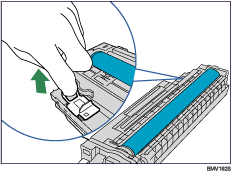
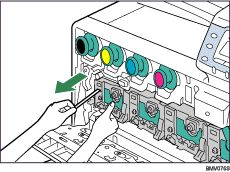
![]() Pull out the ring pull handle of the yellow drum unit.
Pull out the ring pull handle of the yellow drum unit.

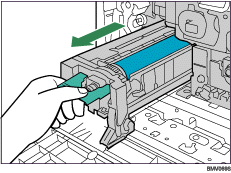
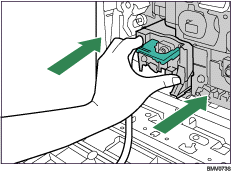
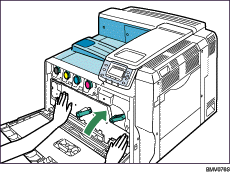
![]() Holding the handle, pull the drum unit out until the green grip area is completely visible on the left side.
Holding the handle, pull the drum unit out until the green grip area is completely visible on the left side.
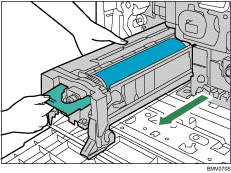
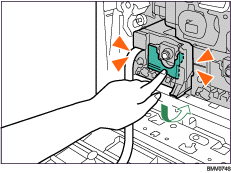
![]() Holding the green grip on the left and the handle on the front, pull out the drum unit.
Holding the green grip on the left and the handle on the front, pull out the drum unit.
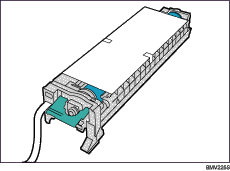
![]() Take the new yellow drum unit out of the box.
Take the new yellow drum unit out of the box.
For black, install one black drum unit; for color, install all three together.
Exposure to light reduces black drum unit/color drum units performance. Replace the unit as quickly as possible.
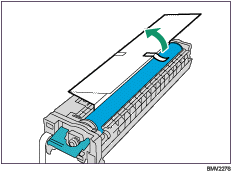
![]() Remove the protecting cover. Do not remove the tape hanging from the front yet.
Remove the protecting cover. Do not remove the tape hanging from the front yet.
Take care that nothing comes into contact with the top surface of the drum unit.
When holding the drum unit, hold the green grip on the left and the handle on the front together. Do not move the drum unit by only holding the grip. Doing so may damage the grip.
![]() Remove all the orange tape from the drum unit. Do not remove the tape coming out of the unit.
Remove all the orange tape from the drum unit. Do not remove the tape coming out of the unit.
![]() Remove the cap.
Remove the cap.
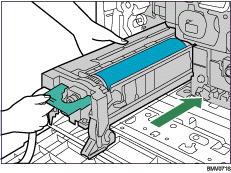
![]() Holding the green grip on the left and the handle on the front, carefully insert the front end into the space horizontally.
Holding the green grip on the left and the handle on the front, carefully insert the front end into the space horizontally.
Insert it horizontally as shown below.
![]() Pushing the front of the drum unit, fully insert it into the printer.
Pushing the front of the drum unit, fully insert it into the printer.
![]() Lower the handle located on the front of the drum unit, and push it until it clicks into place.
Lower the handle located on the front of the drum unit, and push it until it clicks into place.
![]() Holding the drum unit firmly in place, pull out the tape.
Holding the drum unit firmly in place, pull out the tape.
Remember to pull out the tape. Malfunctions occur if you attempt to print while the tape is still attached.
The removed tape is dirty. Be careful not to let it touch your hands or clothes.
![]() When replacing a color drum unit, replace the other two color units together using the same procedure, before closing the inner cover.
When replacing a color drum unit, replace the other two color units together using the same procedure, before closing the inner cover.
![]() Pressing both sides, firmly close the inner cover.
Pressing both sides, firmly close the inner cover.
![]() Turn the two green levers clockwise to lock the cover.
Turn the two green levers clockwise to lock the cover.
![]() Carefully close the front cover.
Carefully close the front cover.
![]() Plug in the power cable, and then turn on the printer.
Plug in the power cable, and then turn on the printer.
[Calibrating...] appears on the display, and the printer starts calibration. Wait until it stops. Calibration takes four to five minutes. Do not turn off the power during calibration. Doing so results in a malfunction.