Setting custom size paper
![]()
When printing on custom size paper, specify the paper size using the control panel or printer driver.
The custom size paper selected using the printer driver overrides that selected using the control panel. Do not configure settings using the control panel if you have already configured settings using the printer driver. However, when printing with a printer driver other than the RPCS printer driver, you must configure the settings using the control panel.
The following is the range of paper size that can be set as custom size: 90 to 305 mm (3.55 to 12 inches) in width and 148 to 1260 mm (5.83 to 49.60 inches) in length.
The printer cannot print to custom size paper from applications that do not support custom size paper.
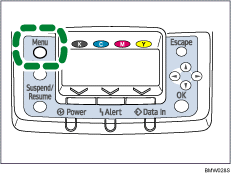
![]() Press the [Menu] key.
Press the [Menu] key.

![]() Press the [
Press the [![]() ] or [
] or [![]() ] key to select [Paper Input], and then press the [OK] key.
] key to select [Paper Input], and then press the [OK] key.

![]() Press the [
Press the [![]() ] or [
] or [![]() ] key to select [Paper Size: Bypass Tray], and then press the [OK] key.
] key to select [Paper Size: Bypass Tray], and then press the [OK] key.

![]() Select [Custom Size] using the scroll keys, and then press the [OK] key.
Select [Custom Size] using the scroll keys, and then press the [OK] key.

![]() Press the [
Press the [![]() ] or [
] or [![]() ] key to enter the horizontal value, and then press the [OK] key.
] key to enter the horizontal value, and then press the [OK] key.

If you press and hold the key, the value increases/decreases by 1 or 10 mm.
![]() Press the [
Press the [![]() ] or [
] or [![]() ] key to enter the vertical value, and then press the [OK] key.
] key to enter the vertical value, and then press the [OK] key.

If you press and hold the key, the value increases/decreases by 1 or 10 mm.
The settings appear and about two seconds later, the display returns to the [Paper Input] screen.
![]() Press the [Menu] key.
Press the [Menu] key.
The display returns to the initial screen.
![]()
Print quality may not be guaranteed for custom size paper that is wider than 297 mm (11.69 inches) in width or longer than 433 mm (17.05 inches) in length.

