Setting paper size not selected automatically
Set the paper size using the control panel when loading paper whose size cannot be selected automatically.
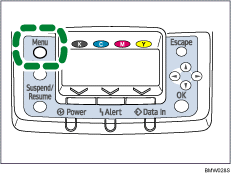
![]() Press the [Menu] key.
Press the [Menu] key.
![]() Press the [
Press the [![]() ] or [
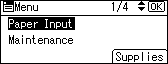
] or [![]() ] key to select [Paper Input], and then press the [OK] key.
] key to select [Paper Input], and then press the [OK] key.
![]() Press the [
Press the [![]() ] or [
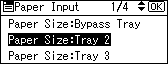
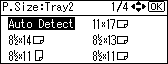
] or [![]() ] key to select [Paper Size: (tray name)], and then press the [OK] key. For example, [Paper Size: Tray 2] is selected for Tray 2 as shown.
] key to select [Paper Size: (tray name)], and then press the [OK] key. For example, [Paper Size: Tray 2] is selected for Tray 2 as shown.
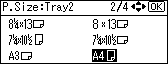
![]() Select the paper size you want to set using the scroll keys, and then press the [OK ] key.
Select the paper size you want to set using the scroll keys, and then press the [OK ] key.
About two seconds later, the display returns to the [Paper Input] screen.
![]() Press the [Menu] key.
Press the [Menu] key.
The display returns to the initial screen. This completes the paper size setting.
If you want to return the settings to [Auto Detect], load paper into the paper tray and follow the procedure below.
![]() Press the [Menu] key.
Press the [Menu] key.
![]() Press the [
Press the [![]() ] or [
] or [![]() ] key to select [Paper Input], and then press the [OK] key.
] key to select [Paper Input], and then press the [OK] key.
![]() Press the [
Press the [![]() ] or [
] or [![]() ] key to select [Paper Size: Tray 2], and then press the [OK] key.
] key to select [Paper Size: Tray 2], and then press the [OK] key.
![]() Select [Auto Detect] using the scroll keys, and then press the [OK] key.
Select [Auto Detect] using the scroll keys, and then press the [OK] key.
About two seconds later, the display returns to the [Paper Input] screen.
![]() Press the [Menu] key.
Press the [Menu] key.
The display returns to the initial screen.