Adjusting the Image Density
You can adjust the image density using the control panel if the image density is not appropriate.
![]()
Extreme settings may create printouts that appear dirty.
Image Density settings should be made from the application or the printer driver whenever possible.
![]() Press the [Menu] key.
Press the [Menu] key.
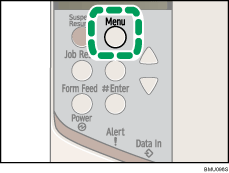
The [Menu] screen appears.
![]() Press the [
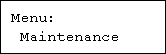
Press the [![]() ] or [
] or [![]() ] key to display [Maintenance], and then press the [
] key to display [Maintenance], and then press the [![]() Enter] key.
Enter] key.
![]() Press the [
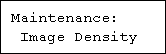
Press the [![]() ] or [
] or [![]() ] key to display [Image Density], and then press the [
] key to display [Image Density], and then press the [![]() Enter] key.
Enter] key.
![]() Press the [
Press the [![]() ] or [
] or [![]() ] key to specify the image density, and then press the [
] key to specify the image density, and then press the [![]() Enter] key.
Enter] key.
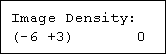
You can specify the image density in the range of -6 to +3.
![]() Press the [Menu] key.
Press the [Menu] key.
The initial screen appears.
![]()
To maintain a darker image under high volume printing conditions, Selecting 3 from the control panel is highly recommended.
You can adjust the image density in seven steps from -6 to +3. Increasing the value makes the printouts darker and decreasing the value makes the printouts lighter.