
| |||
This section introduces the names and functions of the components.
![]()
|
![]()
Do not obstruct the ventilation holes by placing objects near them or leaning things against them. If the machine overheats, a fault might occur.
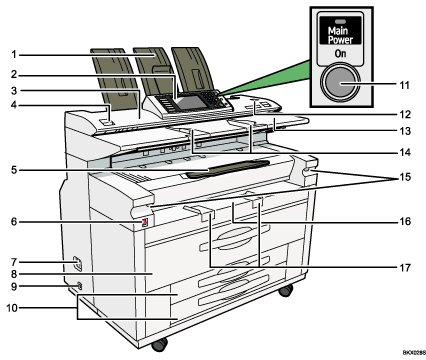
Upper output stacker
When the upper output is selected, output paper is stacked here.
Control panel
See "Control Panel".
Scanner cover
This protects the original feed mechanism and the scanning glass.
Scanner cover release lever
Use to open the scanner cover to clear jammed originals or to clean the machine.
Front output auxiliary tray
Use to receive copy paper. When copying rolled originals, this can also serve as an original tray.
Main power switch
If the machine does not operate after turning on the operation switch, check if the main power switch is turned on. If it is off, turn it on.
See "Turning On/Off the Power".
Earth Leakage Breaker
To prevent electric shock this machine has an earth leakage breaker. The earth leakage breaker is normally in the on position.
If the power does not come on, check if the earth leakage breaker is in the off position. If so, do not turn it to the on position.
Contact your sales or service representative immediately.
Upper tray
Includes Tray 1 (front) and Tray 2 (rear).
Anti-condensation heater switch
If condensation forms inside the machine as a result of temperature change, the machine may not print properly. To minimize this problem, use the anti-condensation heater.
Lower tray (optional) or Cut paper trays (optional)
The illustration shows the cut paper trays.
Operation switch
Press to turn the power on (the operation switch indicator lights up). To turn the power off, press again (the operation switch indicator goes off).
See "Turning On/Off the Power".
[Scanner Stop] key
Use if originals are feeding in slanted, or to cancel scanning while an original is feeding in. You can also use this to release the paper edge hold function.
Original table
Place originals here scanning side up.
Original guide
Set to the width of your originals.
Imaging unit release lever
Use this lever to open the imaging unit when clearing paper jams inside or cleaning the machine.
Do not leave the imaging unit open more than 10 minutes, otherwise copy quality may deteriorate.
While holding down the imaging unit, pull the release lever to open it.
Paper Bypass
Use to feed paper in manually. Load paper print side up.
Paper bypass's paper guide
Set to the width of the paper for bypass copying.
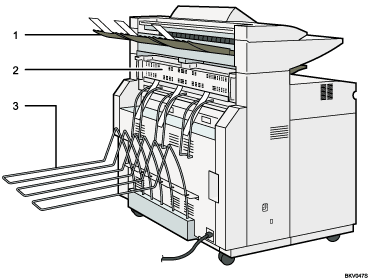
Rear original exit (straight)
Holds originals ejected at the back of the machine
The rear original exit is used when the stacker is attached to the back of the machine. For details, contact your sales or service representative.
Fusing unit cover
Protects the fusing unit.
Rear output
Stacks copies delivered to the rear output.
Anti-humidity heater switch
When humidity is high, paper in the paper tray may absorb moisture, which can affect copy quality. The anti-humidity heater prevents this.
Turn this switch on when humidity is high.
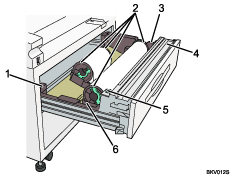
Paper holder
The two paper holders grip the paper roll and are mounted on the paper roll tray's roll holder.
Paper feed knob
Use when loading paper rolls or clearing paper jams.
Cutter knob
Use to manually cut paper if there are paper jams in the cutter area of the machine.
Always return the cutter knob to the left or right end.
Auto feed button
Use this to clear misfeeds in the paper feed area. Keep this button pressed to feed the roll paper continuously.
When approximately 100 mm, 3.9" of paper length is fed, release the button so that paper will be cut automatically.
Roll holder
Adjust this to the size of the paper roll you are using.
| Copyright (C) 2008 |