
| |||
This section describes Auto Color Calibration.
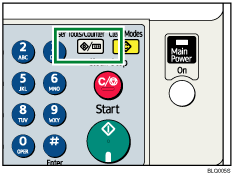
Press the [User Tools / Counter] key.
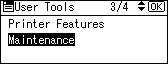
Select [Maintenance] using [![]() ] or [
] or [![]() ], and then press the [OK] key.
], and then press the [OK] key.
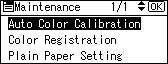
Select [Auto Color Calibration] using [![]() ] or [
] or [![]() ], and then press the [OK] key.
], and then press the [OK] key.
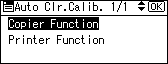
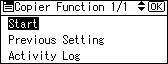
Select [Copier Function] or [Printer Function] using [![]() ] or [
] or [![]() ], and then press the [OK] key.
], and then press the [OK] key.
Select [Start] using [![]() ] or [
] or [![]() ], and then press the [OK] key.
], and then press the [OK] key.
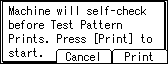
Press [Print] and a test pattern is printed.
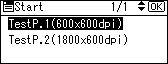
When performing auto color calibration from the printer function, select test patterns from[ TestP.1 (600 ![]() 600 dpi)] or [TestP.2 (1800
600 dpi)] or [TestP.2 (1800 ![]() 600 dpi)] and then press [Print].
600 dpi)] and then press [Print].
Place the test pattern on the exposure glass and press [Scan].

Press [Exit].
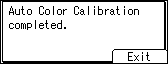
The image will be corrected.
![]()
The test pattern will not be read if it is set in the ADF.
The test pattern will be printed on an A4, 81/2 ![]() 11 size page. If A4 is not available, A3 or B4 JIS (Japanese Industrial Standard) will be used. Make sure to check the paper set in the paper tray.
11 size page. If A4 is not available, A3 or B4 JIS (Japanese Industrial Standard) will be used. Make sure to check the paper set in the paper tray.
Set the test pattern in the following way:

Make sure to set the test pattern on the exposure glass, and then 2 or 3 white sheets, same size as the test pattern, above the test pattern.
| Copyright (C) 2008 |