

  |  | ||
This section explains how to search for an address registered in an LDAP server and specify it as an e-mail destination.
![]()
To use this function, an LDAP server must be connected to the network.
Under [System Settings], the LDAP server must be registered and [LDAP Search] must be set to [On]. For details, see "System Settings", Network and System Settings Guide.
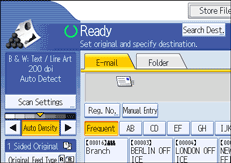
Press [Search Dest.].

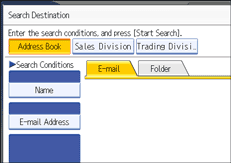
Select the LDAP server that appears next to [Address Book].
Register the LDAP server in advance in [System Settings].

If authentication is required to access the selected server, the authentication screen appears. To authenticate, enter the user name and password.
To search by destination name, press [Name].
To search by e-mail address, press [E-mail Address].
The soft keyboard appears.
You can also search by combining [Name] and [E-mail Address]. If you search by [Name], LDAP server's settings determine whether the search is based on surname or first name. Consult your administrator.
Enter the beginning of the destination name.
To search by e-mail address, enter the beginning of the destination address.
Press [OK].
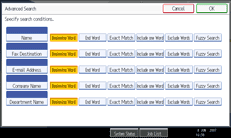
If necessary, press [Advanced Search] to specify the detailed search criteria, and then press [OK].
By pressing [Advanced Search], you can search using criteria such as [Name], [Fax Destination], [E-mail Address], [Company Name], and [Department Name]. You can specify search criteria such as [Beginning Word] or [End Word]. You can refine your search using multiple criteria.

The illustrated screen is an example. The items that actually appear on the screen may differ.
Press [Start Search].
Destinations that match the search criteria are displayed.
Select the destination.
Select [To], [Cc], or [Bcc].
Press [OK].
![]()
The [Name], [Fax Destination], [E-mail Address], [Company Name], and [Department Name] search criteria that appear in [Advanced Search] are registered in the LDAP server.
If you specified [Search Options] on [Program / Change / Delete LDAP Server] under [System Settings], you can add a search condition for LDAP search on the [Advanced Search] screen. For details, see "System Settings", Network and System Settings Guide.
By pressing [Details], you can view details about the selected destinations.
Up to 100 destinations can be displayed as search results.
If an e-mail address returned by the LDAP server is too long, it will be impossible to specify it as the destination. For details about the number of characters that can be specified, see "Sending E-mail".
You can register multiple e-mail addresses in individual LDAP server accounts. However, only one e-mail address will be displayed as the search result. Usually, the address that was registered first on the LDAP server is the address that is displayed.
By pressing [Advanced Search], the following criteria appear:
[Beginning Word]: The names which start with the entered character or characters are targeted.
For example, to search for "ABC", enter "A".
[End Word]: The names which end with the entered character or characters are targeted.
For example, to search for "ABC", enter "C".
[Exact Match]: The names which correspond to an entered character or characters are targeted.
For example, to search for "ABC", enter "ABC".
[Include one Word]: The names which contain an entered character or characters are targeted.
For example, to search for "ABC", enter "A", "B", or "C".
[Exclude Words]: The names which do not contain an entered character or characters are targeted.
For example, to search for "ABC", enter "D".
[Fuzzy Search]: a vague search (The function of this vague search depends on the system supported by the LDAP server.)