Setting Thick Paper, Thin Paper, or OHP Transparencies Using the Control Panel
Follow the procedure below to set the machine using the control panel when loading thick paper, thin paper, or OHP transparencies onto the bypass tray.
![]()
The following procedures are not required if you select [Driver/Command] from [Bypass Tray Setting Priority] in [System] of [Printer Features] (see "System"). In that case, set the paper size using the printer driver.
If you select [Machine Settings] from [Bypass Tray Setting Priority] in [System] of [Printer Features] (see "System"), the settings made using the control panel have priority over the printer driver settings.
If the printer driver is not used, select [Machine Settings] from [Bypass Tray Setting Priority] in [System] of [Printer Features] (see "System"). Set the paper size using the control panel.
When printing onto OHP transparencies, paper thinner than 66.0 g/m2 , or paper of 101 g/m2 or above, you need to specify the type and size of paper with Tray Paper Settings in User Tools Menu. For details about Tray Paper Settings, see "System Settings", Network and System Settings Guide.
Do not use color OHP transparencies that have easily melted coatings.
When printing onto OHP transparencies, use A4
 , or 81/2 "
  11 "
11 " , size sheets, and specify its size.
Be sure to remove printed OHP transparencies one by one as they are delivered. This prevents them sticking together.
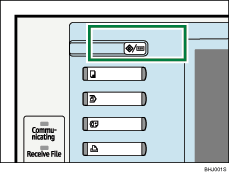
![]() Press the [User Tools/Counter] key on the control panel.
Press the [User Tools/Counter] key on the control panel.

![]() Press [System Settings].
Press [System Settings].
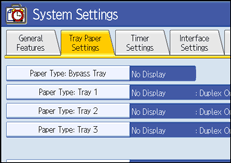
![]() Press the [Tray Paper Settings] tab.
Press the [Tray Paper Settings] tab.
![]() Press [
Press [![]() Next] to scroll through the list.
Next] to scroll through the list.
![]() Press [Paper Type: Bypass Tray].
Press [Paper Type: Bypass Tray].

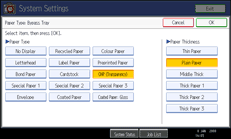
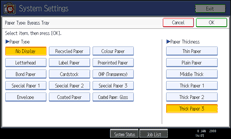
![]() Select the proper items, according to the paper type you want to set.
Select the proper items, according to the paper type you want to set.
Press [OHP (Transparency)] on the [Paper Type] area when loading OHP transparencies.

Press [No Display] on the [Paper Type] area, and then press [Thick Paper 1], [Thick Paper 2], [Thick Paper 3], or [Thin paper] on the [Paper Thickness] area when loading thick paper or thin paper.

![]() Press [OK].
Press [OK].
The paper type selected is displayed.
![]() Press the [User Tools/Counter] key.
Press the [User Tools/Counter] key.
The initial screen appears.
![]()
Printing on special paper such as thick paper, thin paper, or OHP transparencies may be slower than printing on plain paper.
The settings made will remain valid until they are reset again. After printing on OHP transparencies or thick paper, thin paper, make sure to clear settings for the next user.
For details about setting printer drivers, see the printer driver Help.

