
| |||
In the case of using WPA on a network, activate the WPA setting to be used for communication along with WPA. Consult your network administrator for information about making authentication settings.
![]()
For setting WPA, installing the optional HDD or the optional Data Storage Card is required.
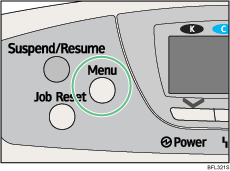
Press the [Menu] key.
Press the [![]() ] or [
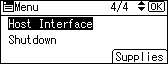
] or [![]() ] key to select [Host Interface], and then press the [OK] key.
] key to select [Host Interface], and then press the [OK] key.
Press the [![]() ] or [
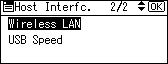
] or [![]() ] key to select [Wireless LAN], and then press the [OK] key.
] key to select [Wireless LAN], and then press the [OK] key.
Press the [![]() ] or [
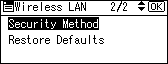
] or [![]() ] key to select [Security Method], and then press the [OK] key.
] key to select [Security Method], and then press the [OK] key.
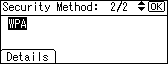
Press the [![]() ] or [
] or [![]() ] key to select [WPA], and then press [Details].
] key to select [WPA], and then press [Details].
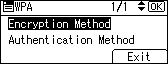
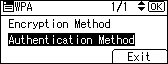
Press the [![]() ] or [
] or [![]() ] key to select [Encryption Method], and then press the [OK] key.
] key to select [Encryption Method], and then press the [OK] key.
Press the [![]() ] or [
] or [![]() ] key to select encryption method, and then press the [OK] key.
] key to select encryption method, and then press the [OK] key.
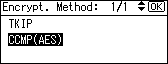
Consult your network administrator for information about making encryption settings.
Encryption settings are as follows:
[TKIP]
Uses the same algorithm as RC4, but further reduces vulnerability using methods such as key mixing.
[CCMP(AES)]
Increases security using AES (Advanced Encryption Standard).
The display returns to the [WPA] menu.
Press the [![]() ] or [
] or [![]() ] key to select [Authentication Method], and then press the [OK] key.
] key to select [Authentication Method], and then press the [OK] key.
Press the [![]() ] or [
] or [![]() ] key to select authentication settings, and then press the [OK] key.
] key to select authentication settings, and then press the [OK] key.
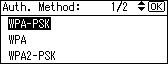
Authentication settings are as follows:
[WPA-PSK]
Performs authentication using an encryption key (a Pre-Shared Key) that is shared by the access point and client.
[WPA]
WPA uses CA certificates and a RADIUS server to provide secure wireless communication.
[WPA2-PSK]
As with WPA-PSK, authenticate using the encryption key (a Pre-Shared Key) shared by the access point and client. Enter Pre-Shared Key using between 8 and 63 ASCII characters.
[WPA2]
WPA2 is an expanded version of WPA that fully supports IEEE 802.11i.
Wait for two seconds, the display returns to the [WPA] menu.
If [WPA] or [WPA2] is selected in step 9, a confirmation message appears. Press the [OK] key.
Wait for two seconds. The display returns to the [WPA] menu.
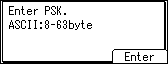
If [WPA-PSK] or [WPA2-PSK] is selected in step 9, a confirmation message appears. Press [Enter].
Press the [![]() ] or [
] or [![]() ] key to enter the Pre-Shared Key, and then press the [OK] key.
] key to enter the Pre-Shared Key, and then press the [OK] key.
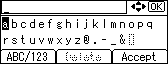
When entering a character, pressing [OK] will mask it with an asterisk for security reasons.
Enter the Pre-Shared Key using between 8 and 63 ASCII characters.
Uppercase and lowercase letters are differentiated, so be sure to enter characters in the required case.
When all characters have been entered, press [Accept].

Wait for two seconds. The display returns to the [Authentication Method] menu.
Press [Exit].
Check [WPA] is selected, and then press the [OK] key.
Press the [Menu] key to return to the initial screen.
Print a configuration page to confirm the settings made.
![]()
For details about printing the configuration page, see "Test Printing", Quick Installation Guide.
| Copyright (C) 2007 |