Installing the Hard Disk
![]()
Before touching the hard disk drive, touch something metal to discharge any static electricity. Static electricity can damage the hard disk drive.
Do not subject the hard disk drive to physical shocks.
Install the hard disk carefully if the SDRAM module is already installed. If the hard disk comes in contact with the SDRAM module, the SDRAM module may become damaged.
Before using the new hard disk drive, be sure to make the settings in the printer driver.
![]() Check the package contains the followings:
Check the package contains the followings:
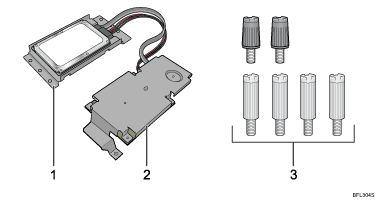
Hard Disk Drive Unit
Hard Disk Board Unit
Six Screws
![]() Turn off the power, and then unplug the power cable.
Turn off the power, and then unplug the power cable.
![]() Loosen the three screws securing the controller board.
Loosen the three screws securing the controller board.
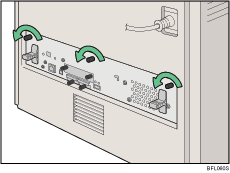
![]() Grasp the handles and carefully pull out the controller board.
Grasp the handles and carefully pull out the controller board.
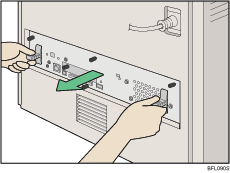
Using both hands, slide the controller board completely out.
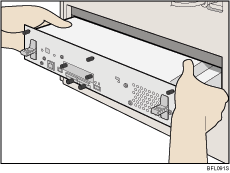
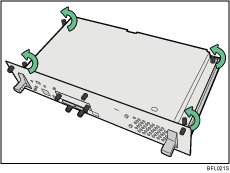
![]() Place the controller board on a flat surface, and then loosen the four screws to remove the cover.
Place the controller board on a flat surface, and then loosen the four screws to remove the cover.
![]() Be sure to install the hard disk drive unit as shown.
Be sure to install the hard disk drive unit as shown.
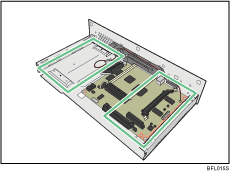
![]() Align the hard disk drive unit with the protrusion on the controller board, and then carefully set the hard disk drive unit onto the controller board.
Align the hard disk drive unit with the protrusion on the controller board, and then carefully set the hard disk drive unit onto the controller board.
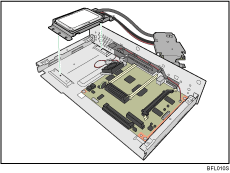
![]() Hook the edge of the hard disk board unit into the protrusion on the controller board, and then push on the hard disk board unit until the connector is fully covered.
Hook the edge of the hard disk board unit into the protrusion on the controller board, and then push on the hard disk board unit until the connector is fully covered.
Make sure the hard disk board unit is set horizontally against the controller board.
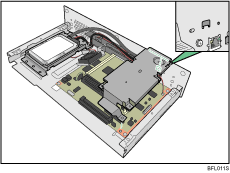
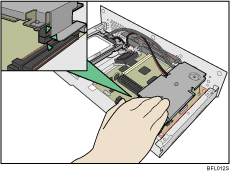
![]() Use the screws supplied with the hard disk drive to secure the two units to the controller board.
Use the screws supplied with the hard disk drive to secure the two units to the controller board.
Use the two shorter screws attached to the rear of the controller board.
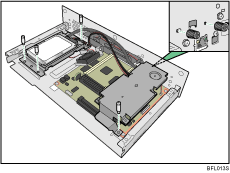
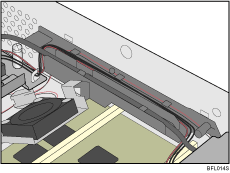
![]() Place the flat cable and the power cable in the groove on the controller board.
Place the flat cable and the power cable in the groove on the controller board.
Place the flat cable in the inner rail, and the power cable in the outer rail.
![]() To install other options on the controller board, follow the appropriate installation procedure(s), and then screw down the controller board cover.
To install other options on the controller board, follow the appropriate installation procedure(s), and then screw down the controller board cover.
![]() Fasten the four screws to attach the cover.
Fasten the four screws to attach the cover.
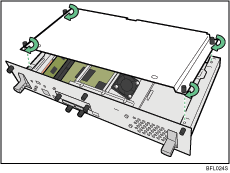
![]() Align the controller board with the left and right rails, and then push it carefully in, until it stops.
Align the controller board with the left and right rails, and then push it carefully in, until it stops.
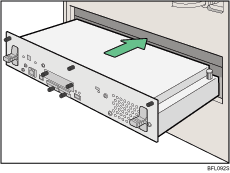
The printer may malfunction if the controller board is not properly installed.
![]() Fasten the controller board to the printer using the three screws.
Fasten the controller board to the printer using the three screws.
![]()
After finishing the installation, you can check the hard disk is properly installed: Print the configuration page from the [List/Test Print] menu.
Confirm that the hard disk drive was correctly installed by printing the configuration page. If it is correctly installed, "Hard Disk Drive" will appear for "Device Connection" on the configuration page.
If the hard disk drive is not properly installed, repeat this procedure. If you cannot install it properly even after reinstallation, contact your sales or service representative.
For details about on printing the configuration page, see "Test Printing", Quick Installation Guide.

